Updating the SWIFT Country table in Integrator
Country table update general procedure
Importing the add-on Integration-Process
Creating the Composer objects
Running the update
Country table update: General procedure
- Import the add-on Integration-Process for the Integrator Country table.
- Create the following set of Composer objects to support the Country table update:
- Integrator Axway Server
- FTP Partner
- FTP input Channel
- FTP output Channel
- Integration-Task
- Update the table.
Importing the add-on Integration-Process for the Country table
- Unzip the FEX installation package to extract the files.
- Start Composer.
- In the Composer Integration-Services Workbench tab, click to select the user folder in which you want to work.
- From the Composer Tools menu, execute the Import object command. Composer displays the Import Wizard.
- In the Import Wizard, navigate to the FEX installation package directory \Software\integrator\composer
- Select to import the file ip_generate_country.xml
- Click Finish.
- Composer imports the file and creates the IP_GENERATE_COUNTRY Integration-Process in the Integration-Process folder of the Composer navigation pane.
- You can now open and display the IP_GENERATE_COUNTRY Integration-Process in Composer.
Creating the Composer objects
After you import the Integration-Process, create the following objects in Composer:
- Axway Server to represent the Integrator Server instance
- FTP Partner to represent the FTP Server.
- FTP in Channel
- FTP out Channel
- Integration-Task
These objects operate as a set with the IP_GENERATE_COUNTRY Integration-Process you imported in the previous section. Together these objects enable you to generate the SWCountry.txt file that you can use to import data to the Country table.
Creating the Integrator Axway Server object
In most cases, you will already have created an Axway Server object in Composer to represent the Integrator Server instance where the SWIFT tables reside. If this is the case, you reuse the same object for SWIFTNet Portal Table updating procedures.
If for any reason you need to create a new Integrator Axway Server object, refer to the topic that describes the Axway Server creation procedure.
Creating the FTP Partner
About the FTP Partner object
A Partner object specifies the machine, protocols and access mechanisms that enable a Integrator to communicate with an FTP server application.
Prerequisites
Before you create the Partner object, you must create:
- CommNetwork object that defines the network protocol you use to communicate between Integrator and FTP.
- Host object that defines characteristics of the machine where the FTP Server instance runs.
- Optionally, a HostGroup object that defines characteristics of the machine where the FTP application is situated.
Procedure
- In the Composer Integration-Services workbench Transport tab, double-click a HostGroup to display a list of Hosts.
- Right-click the Host where you want to define the Partner. From the context menu, select Partner.
- Composer opens the Partner properties window.
- In the General tab, enter a name for the Partner object.
- In the Communication tab:
- In the left pane, add a TCP.
- Right-click the TCP CommNetwork node and from the context menu, select Add a CommAdapter.
- Composer adds a CommAdapter node as a child node of the CommNetwork node in the left pane, and opens the CommAdapter properties window in the right pane.
- In the CommAdapter type field select FTP.
- Composer adds a Configuration sub-tab for configuring the FTP CommAdapter.
- Complete the Configuration sub-tab.
 View field descriptions
| TCP/IP port |
Enter a port or accept the default port: 21.
|
| Protocol timeout (seconds) |
Enter a timeout limit for the connection.
|
- Right-click the CommAdapter node in the left pane, and from the context menu, select Add a CommPoint.
- Composer adds a CommPoint node as a child node of the CommAdapter node in the left pane, and opens the CommPoint properties window in the right pane.
- Complete the Configuration sub-tab.
 View field descriptions
| User |
Enter the username for the FTP user on the remote FTP server.
|
| Account |
Enter the account to use
|
| Password |
Enter the password to use.
|
Transfer timeout
(Mandatory) |
Enter the timeout in seconds.
|
- From the File menu, select:
- Check to verify that all mandatory object definitions are correct
- Save to save the object definition in the Composer database.
- Close to close the object properties window.
Creating the Integrator FTP input Channel
- In the Composer Integration-Services workbench, Transport tab /Hierarchy sub-tab, right-click the Axway Server object that represents Integrator and then select Channel from the context menu.
- Composer displays the Channel properties window.
- Complete the General tab:
 View field descriptions
| Name |
Enter a name for the Channel. For example, In_country. |
| Label |
Optionally enter a description. |
| Status |
You cannot directly change the status in this field. |
| Endpoints |
| Terminus1 |
From the drop-down list, select Partner. Then from the Instance field drop-down list, select the Partner object that represents the FTP server application. |
| Terminus2 |
From the drop-down list, select Axway Server. Then from the Instance field drop-down list, select the Axway Server object that represents the Integrator Server. |
| Connection parameters |
| Connection type |
Select TCP / FTP |
| Connection point 1 |
Select the FTP CommAdapter (this is for the connection on the Integrator side) |
| Connection point 2 |
Select the FTP CommAdapter (this is for the connection on the FTP Server side) |
- In the Connection point 2 tab,:
- In the Receiver or Sender field select Receiver.
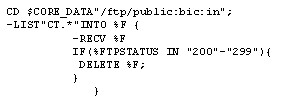
- Receive script field: Enter a receive script such as the following:
-

- Check, save and close the object.
- Send the Channel object to production.
- Composer sets the object status to committed.
Creating the Integrator FTP output Channel
- In the Composer Integration-Services workbench, Transport tab /Hierarchy sub-tab, right-click the Axway Server object that represents Integrator and then select Channel from the context menu.
- Composer displays the Channel properties window.
- Complete the General tab:
 View field descriptions
| Name |
Enter a name for the Channel. For example, Out_country. |
| Label |
Optionally enter a description. |
| Status |
You cannot directly change the status in this field. |
| Endpoints |
| Terminus1 |
From the drop-down list, select Partner. Then from the Instance field drop-down list, select the Partner object that represents the FTP server application. |
| Terminus2 |
From the drop-down list, select Axway Server. Then from the Instance field drop-down list, select the Axway Server object that represents the Integrator Server. |
| Connection parameters |
| Connection type |
Select TCP / FTP |
| Connection point 1 |
Select the FTP CommAdapter (this is for the connection on the Integrator side) |
| Connection point 2 |
Select the FTP CommAdapter (this is for the connection on the FTP Server side) |
- In the Connection point 2 tab,:
- In the Receiver or Sender field select Sender.
- Receive script field: Enter a receive script such as the following:
-

- Check, save and close the object.
- Send the Channel object to production.
- Composer sets the object status to committed.
Creating the Integration-Task
The Integration-Task object contains the technical information that is necessary to execute your Integration-Process on an Integrator Server.
For SWIFT table integration you use the Integration-Task to link the Receive and Send Activities to the appropriate Channels.
In the Composer Integration-Services workbench, from the File menu, select New > Integration > Integration-Task.
- Composer displays the Integration-Task properties window.
- Complete the General tab:
 View field descriptions
| Name |
Enter a name for the Integration-Task. For example: it_generate_country.xml. |
| Integration-Process |
From the drop-down list, select the Integration-Process you imported for Country table updates:ip_generate_country.xml |
| Integrator Server |
Select the name of the Integrator Server instance on which you want to run the integration. |
- When you associate an Integration-Process with the Integration-Task and specify the Integrator Server that runs the task, Composer automatically adds a Configuration tab to the Integration-Task definition screen.
- Complete the Configuration tab:
 View fields
| In Activity |
Associate this Activity with the FTP input Channel |
| DML_Country Map Stage |
Associate this Stage with the MappingProcess MFC |
| Out Activity |
Associate this Activity with the FTP output Channel |
- Check, save and close the object.
- Send the Integration-Task to the Integrator Server.
Updating the Country table with the CT.dat file
If you are a subscriber to the appropriate SWIFT services, SWIFT periodically supplies you with a CT.dat data file that you can use to update the content of the Country table:
To use the CT.dat file to update the content of a Country Code table:
- Copy the CT.dat file from the file where you store your SWIFT-supplied data files to the input Channel folder specified in the IN Channel script.
- Integrator runs the Integration-Task processes and deposits the resulting SWCountry.txt file in the Channel out directory.
- Retrieve the SWCountry.txt file from the output Channel folder that is specified in the out Channel script. Copy the file to a storage folder on a local disk.
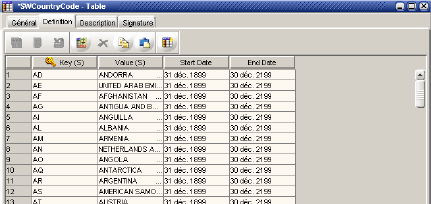
- In the left frame of Composer, select the Mapping Manager sub-tab of the Integration tab. In the Mapping Manager sub-tab, double-click the SWCountry table entry located in the subnode SWIFT_DATA.
- Composer displays the SWCountryCode Table properties window.
- Click the Import from CSV file icon and then select the SWCountry.txtfile that you retrieved in step 2 above.
- Composer populates the table with data from the selected file.
-

Related topics
Managing SWIFT tables in Integrator


