KB Article #180171
Monitoring JVMs with VisualVM
Monitoring a system is an important part of an application's and a server's life, especially for critical and complex environments. While not universally required, being aware of the state of the system at all times is a good practice and in some cases may be crucial for determining the cause of an issue or even proactively avoiding a problem. This article will provide information how to use the VisualVM tool to monitor the resource usage of the JVM that runs SecureTransport.
Table of contents
Introduction
VisualVM is a tool that provides a visual interface for viewing detailed information about Java applications while they are running on a Java Virtual Machine (JVM). VisualVM is lightweight tool integrated in the Java Development Kit (JDK). It is designed for both development and production time use.
VisualVM comes in two distributions:
VisualVM at GitHub
This is a bleeding-edge distribution with the latest VisualVM features. Can be downloaded from its GitHub page. The ZIP file contains a version suitable for Windows and Linux. It requires JDK to be installed on OS level to operate.
Java VisualVM as a JDK tool
A stable version of the tool available in Oracle JDK 8, which can be found at this link: Download Oracle JDK 8.
NOTE: VisualVM has been discontinued in Oracle JDK 9.
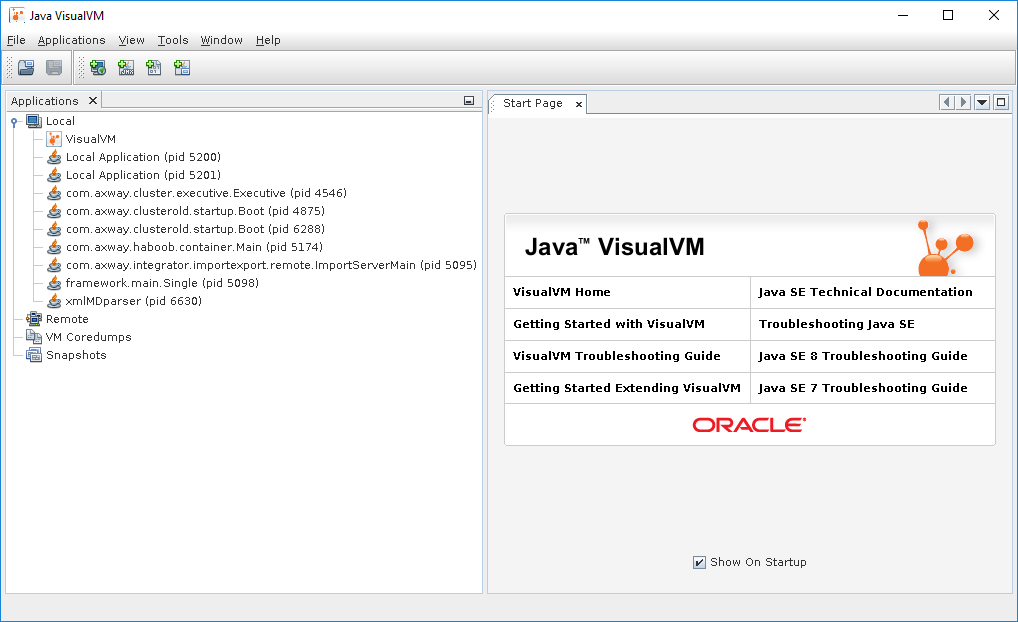
The start screen of VisualVM contains links to the documentation, to the GitHub home page, etc.
The documentation is a valuable source of information how to use VisualVM and we urge you to familiarize yourself with it.
Highlights
The main VisualVM window provides several tabs with labels such as Overview, Monitor, Threads, and Sampler which show different kind of information about the JVM application. With Local Monitoring on Linux an additional tab - Profiler - becomes available, but it is intended for software testing during development and it is similar to Sampler tab.
Below you will find illustration of each tab's information from real-life monitoring of B2Bi's Trading Engine (TE) and SecureTransport's Transaction Manager (TM). The screenshots were made with Local Monitoring on Linux.
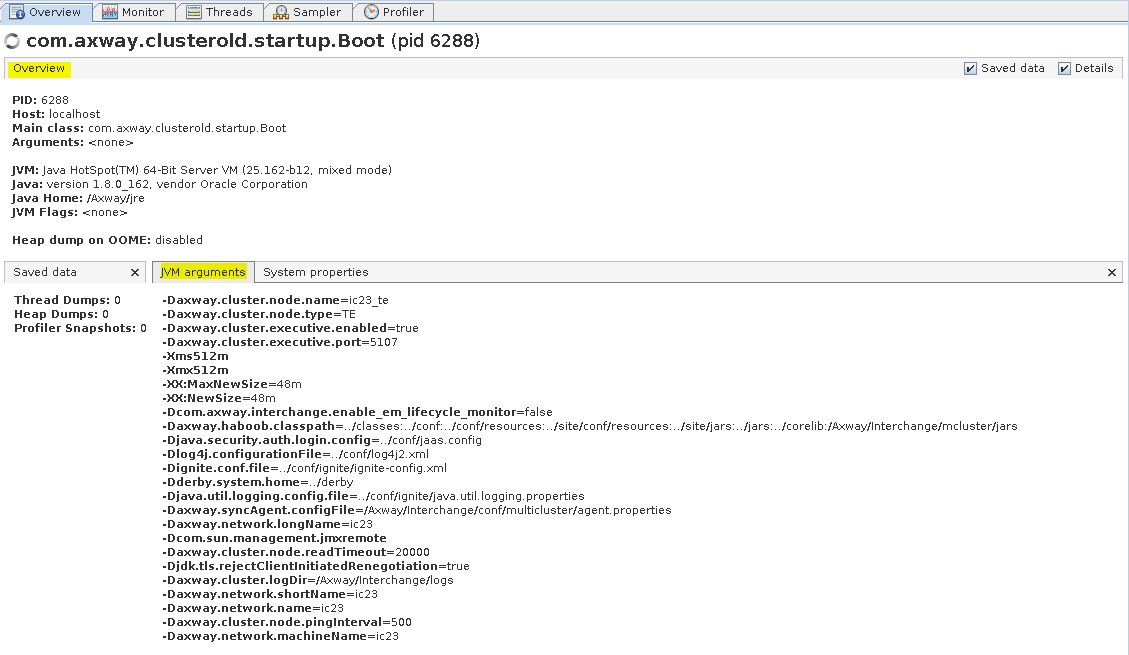
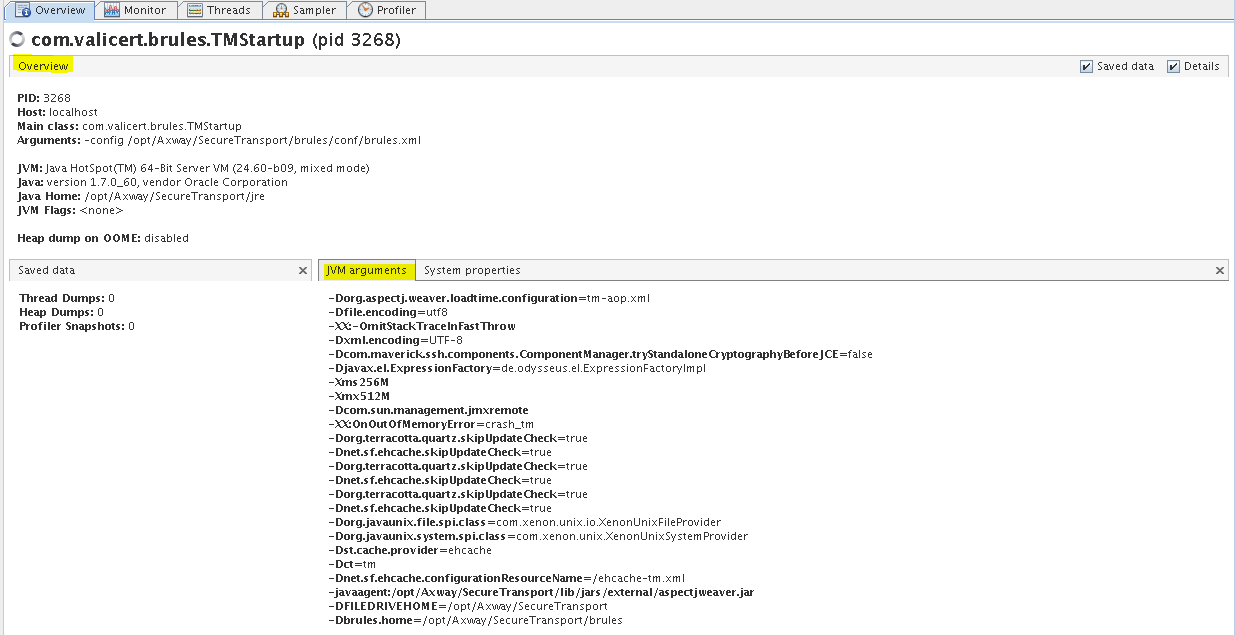
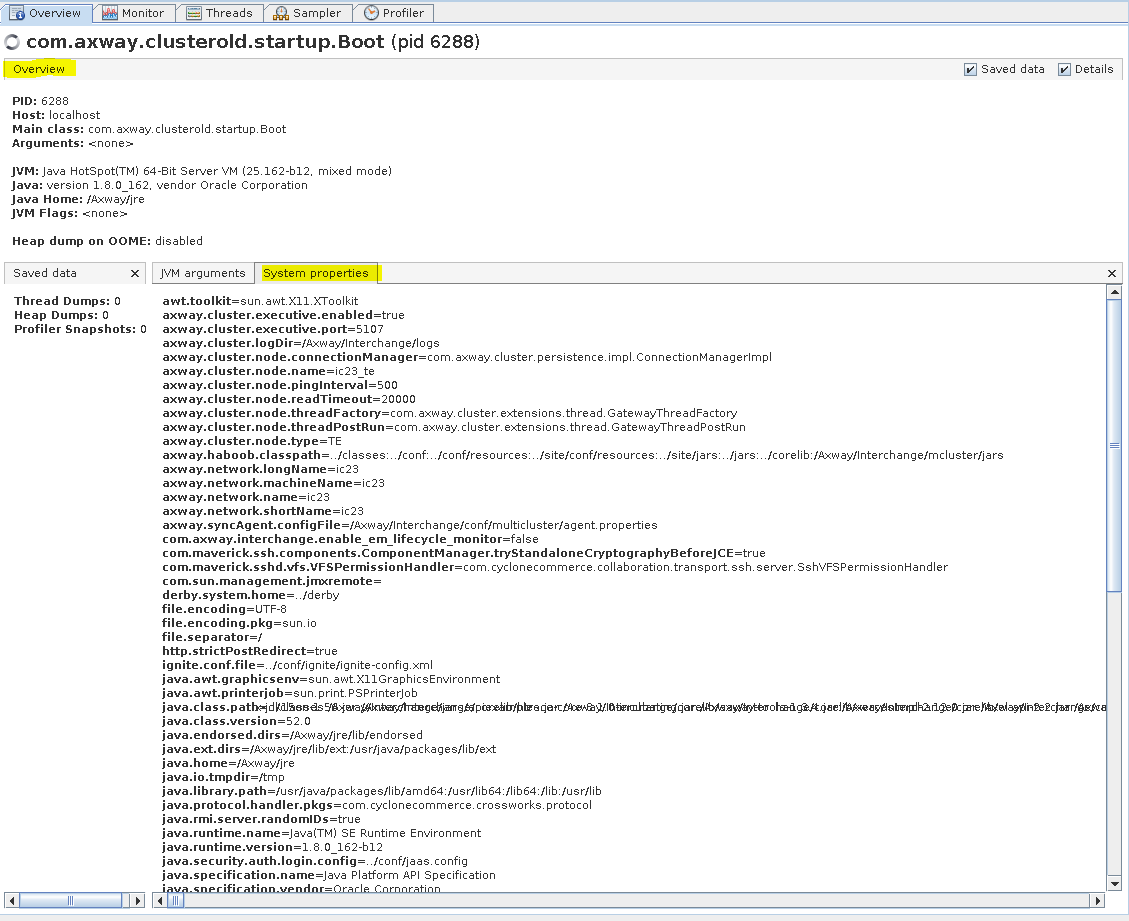
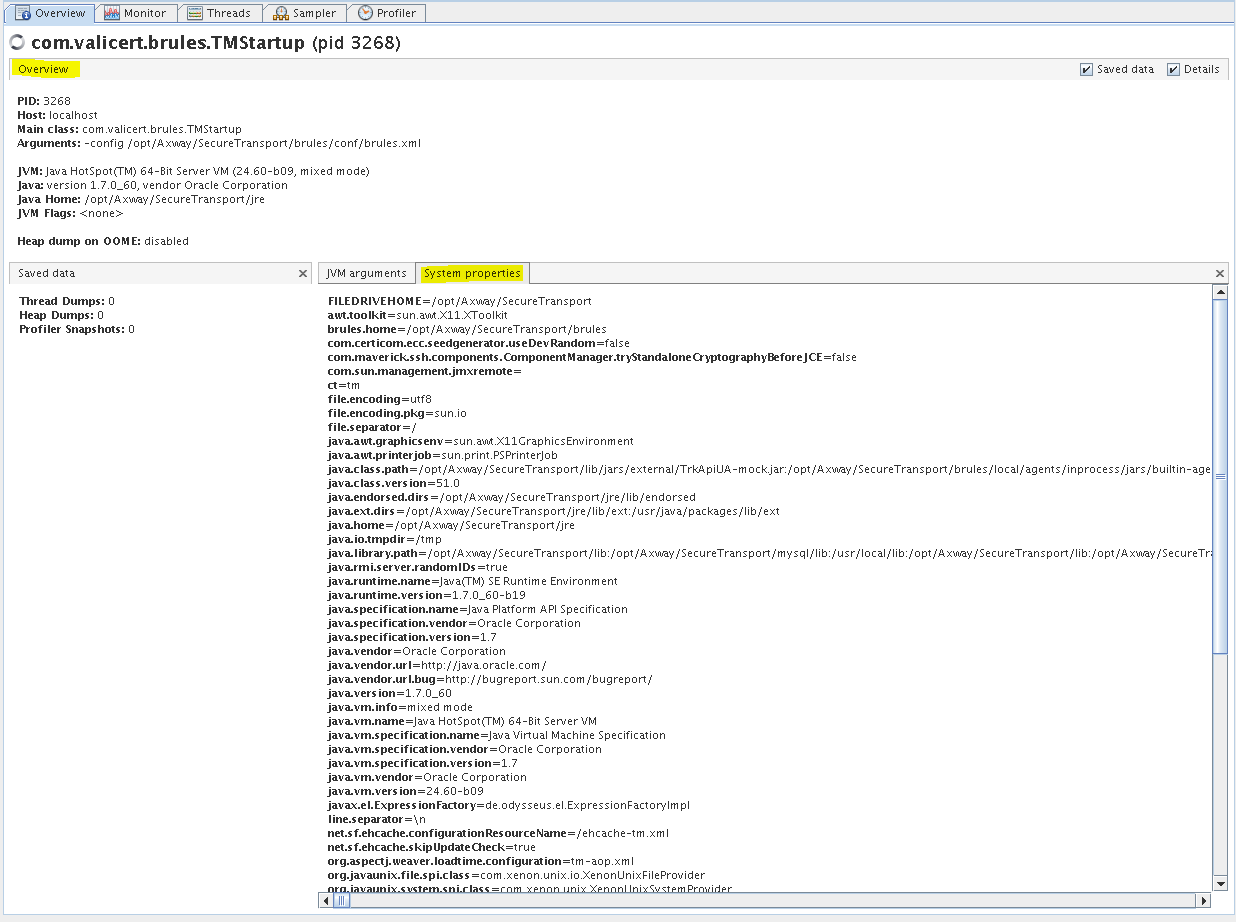
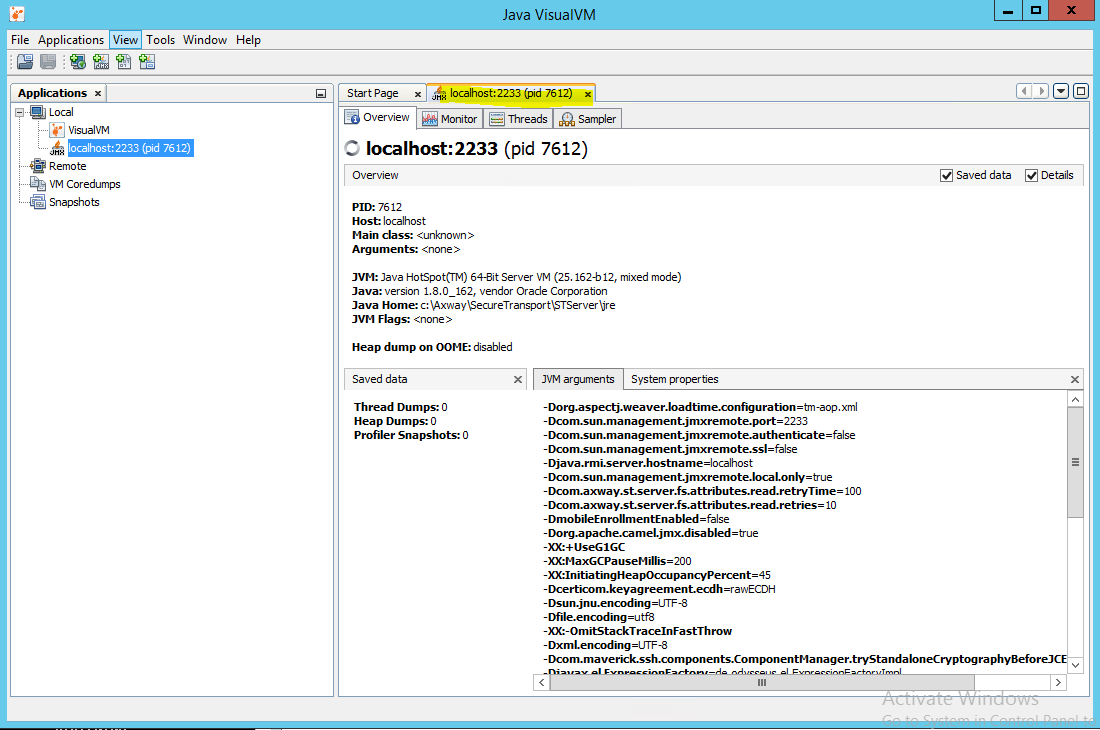
You can view JVM settings in the Overview tab and the subtabs JVM Arguments and System properties.
B2Bi TE - Overview tab (JVM Arguments)
ST TM - Overview tab (JVM Arguments)
B2Bi TE - Overview tab (System properties)
ST TM - Overview tab (System properties)
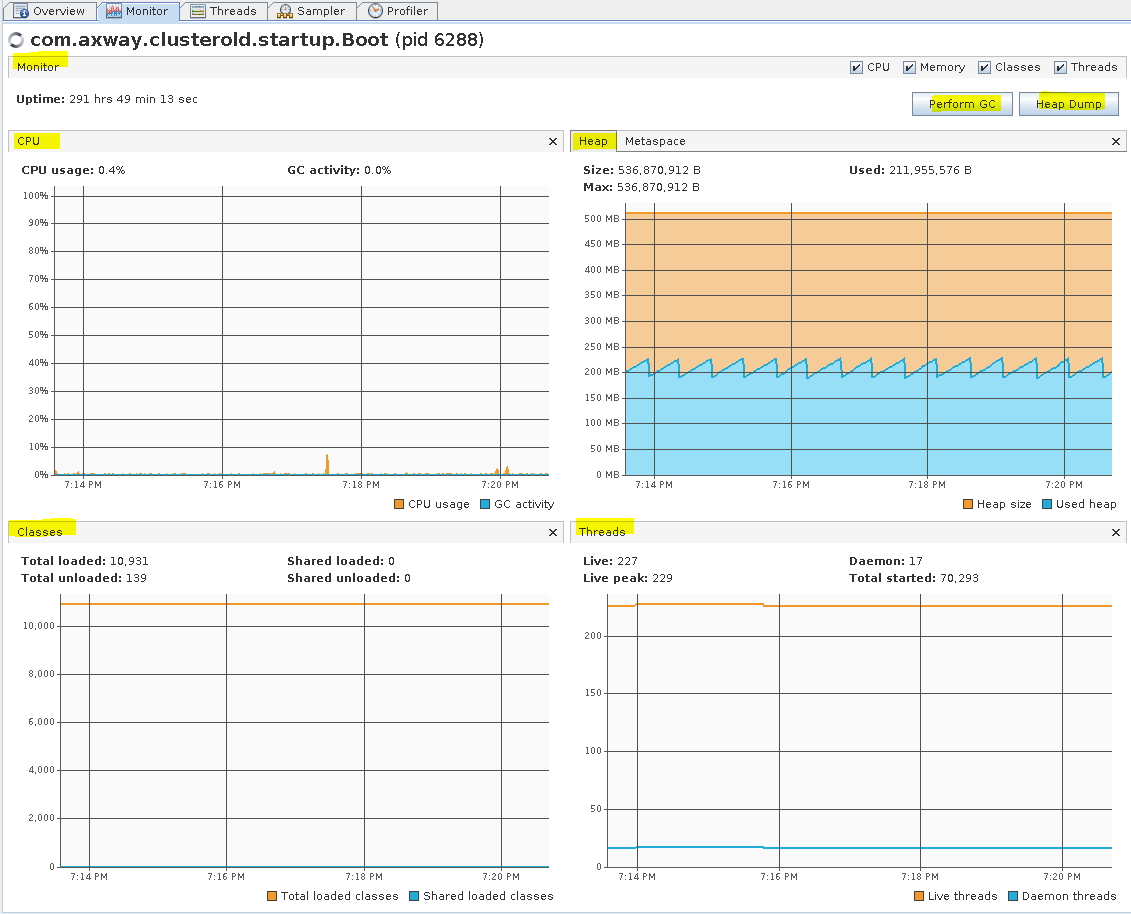
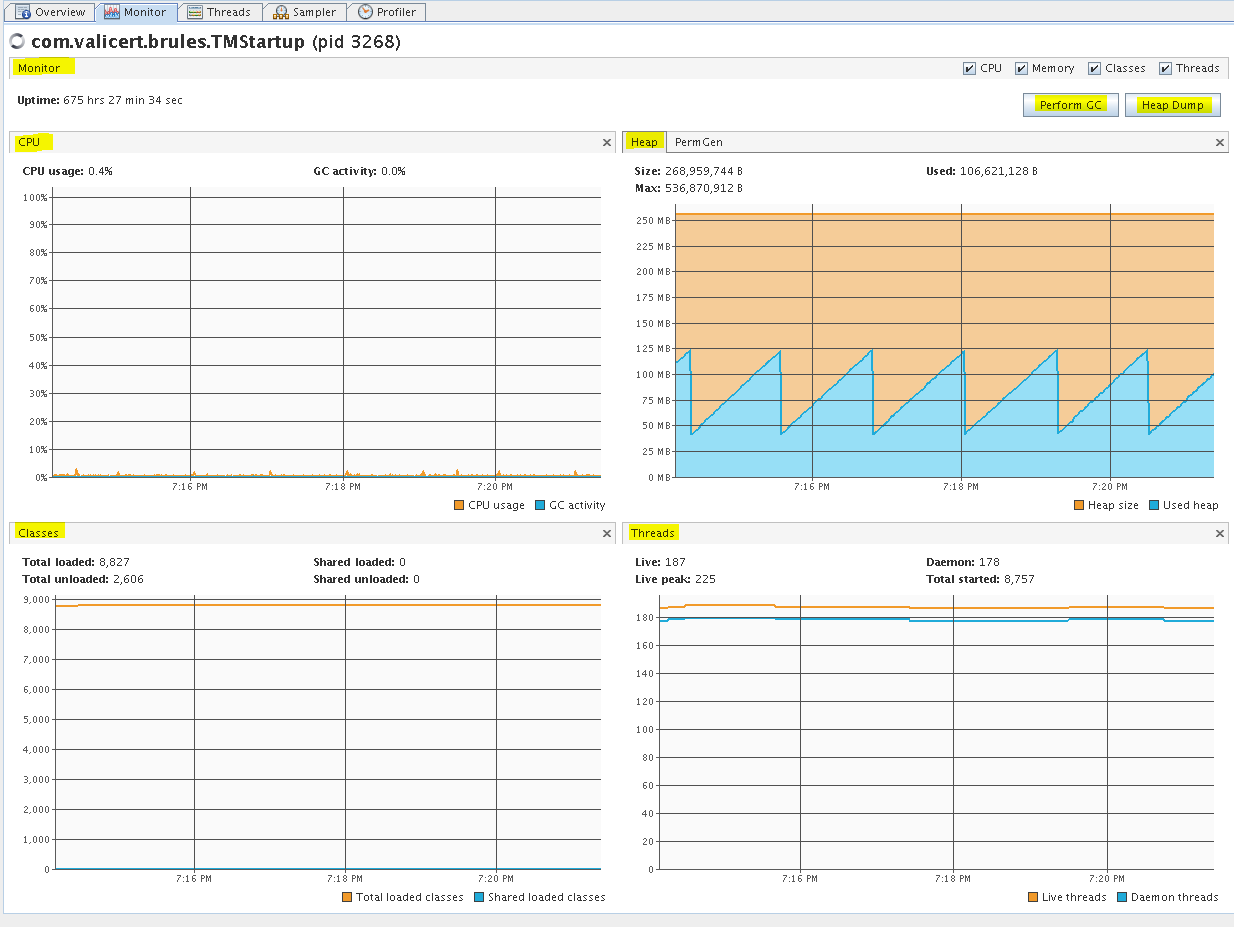
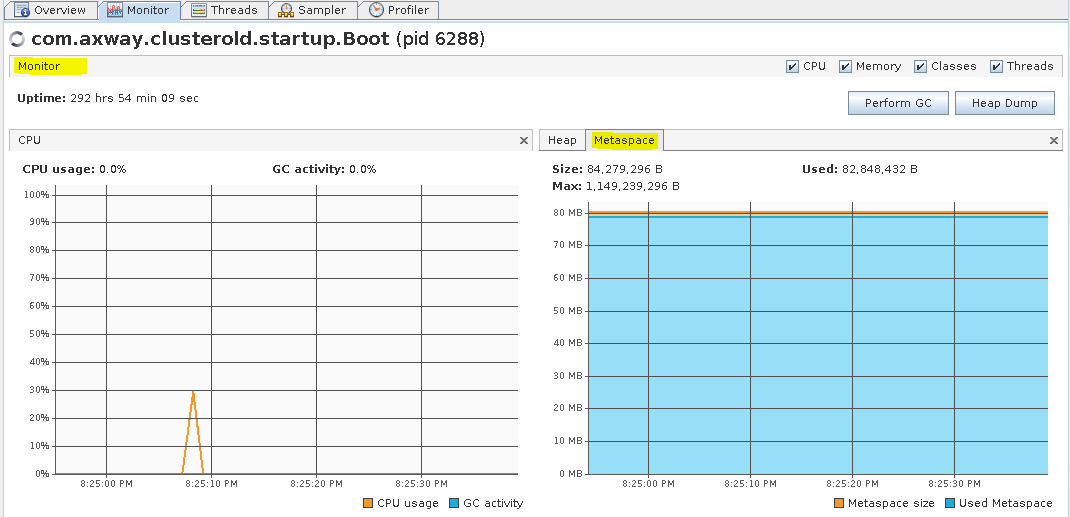
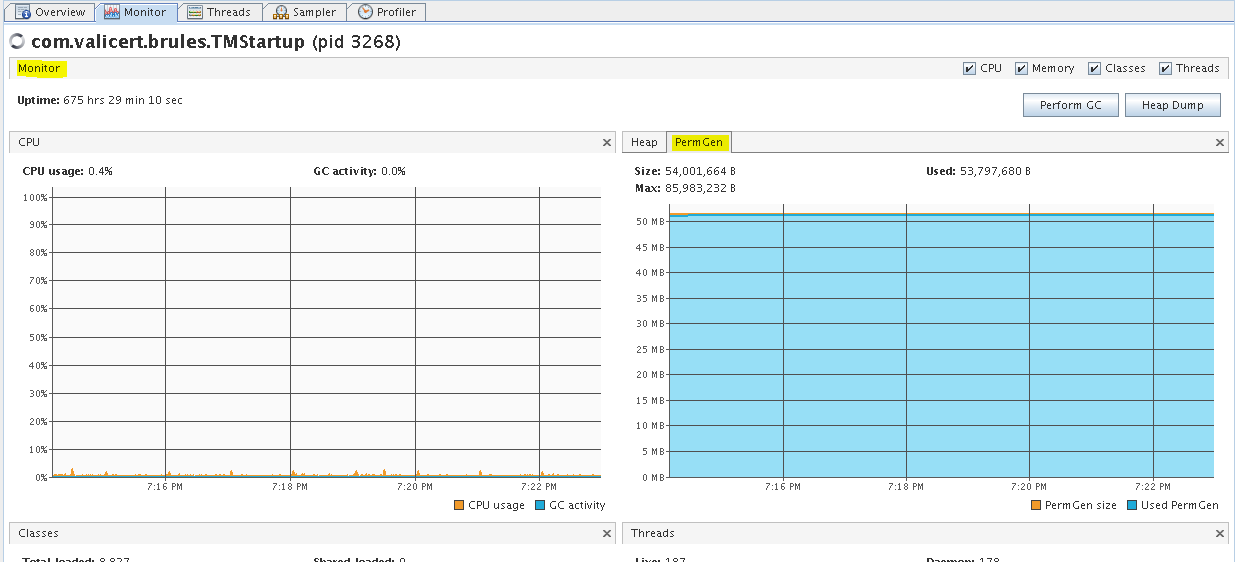
You can monitor CPU, Memory, Classes, and Threads in the Monitor tab. In this tab you can also manually execute GC and collect heap dumps.
B2Bi TE - Monitor tab (Heap)
ST TM - Monitor tab (Heap)
B2Bi TE - Monitor tab (Metaspace)
ST TM - Monitor tab (PermGen)
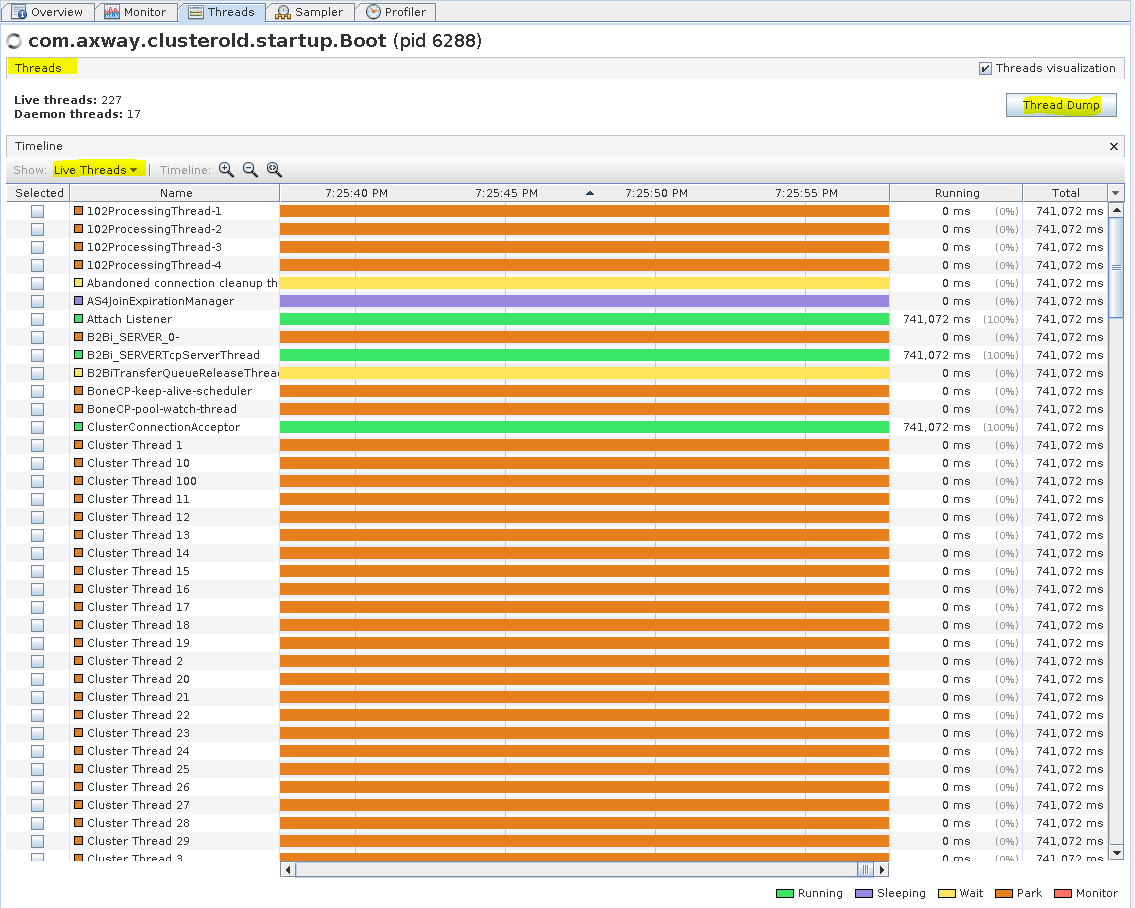
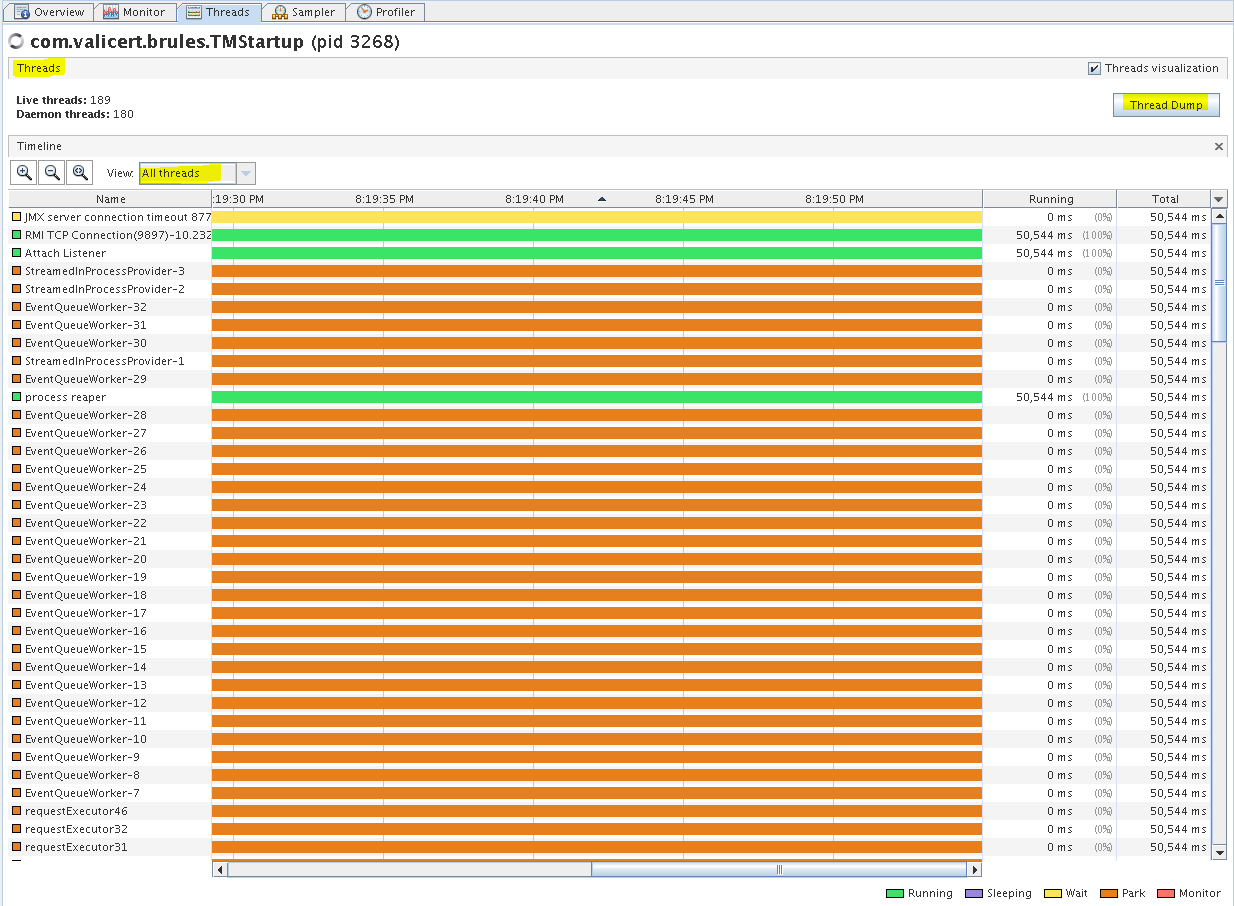
You can monitor the Java threads in the Threads tab. In this tab you can collect a thread dump and filter the threads by type (i.e. "All Threads", "Live Threads", "Finished Threads", and "Selected Threads").
B2Bi TE - Threads tab (Live Threads)
ST TM - Threads tab (All Threads)
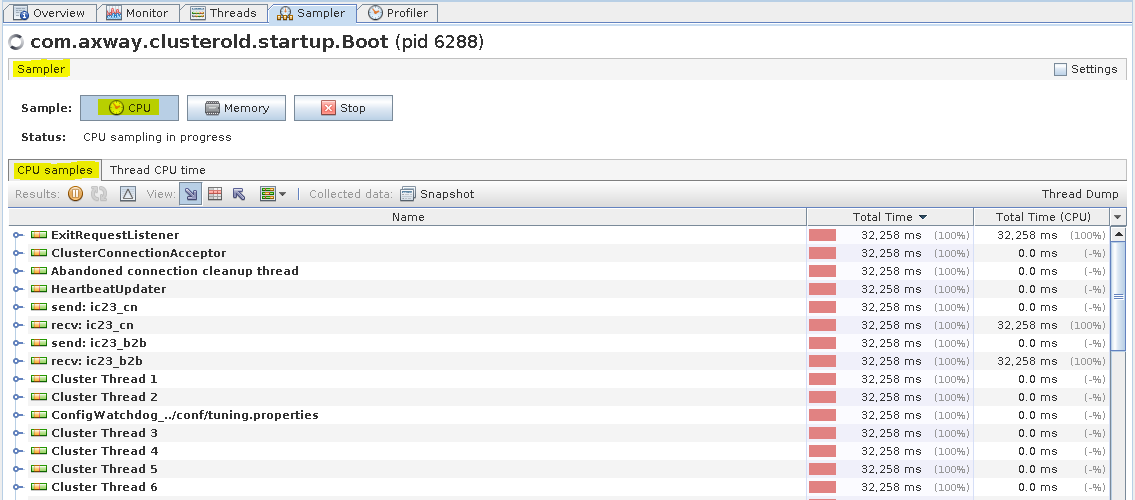
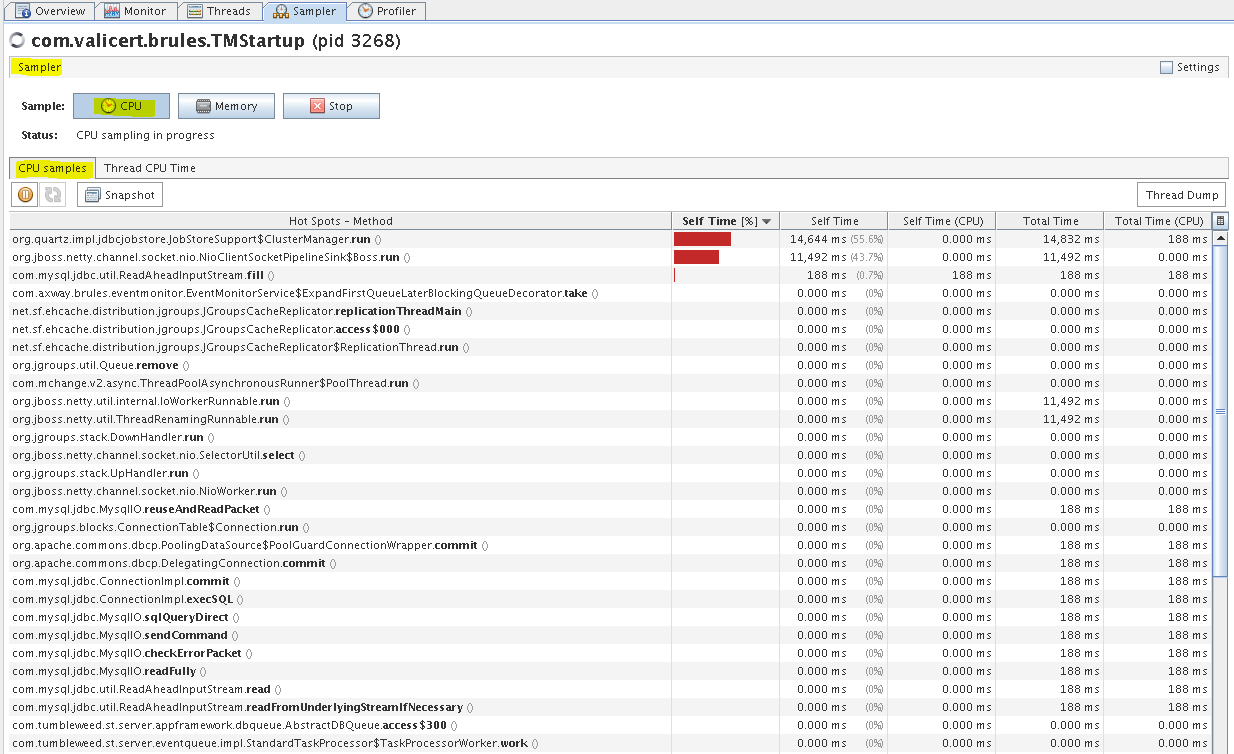
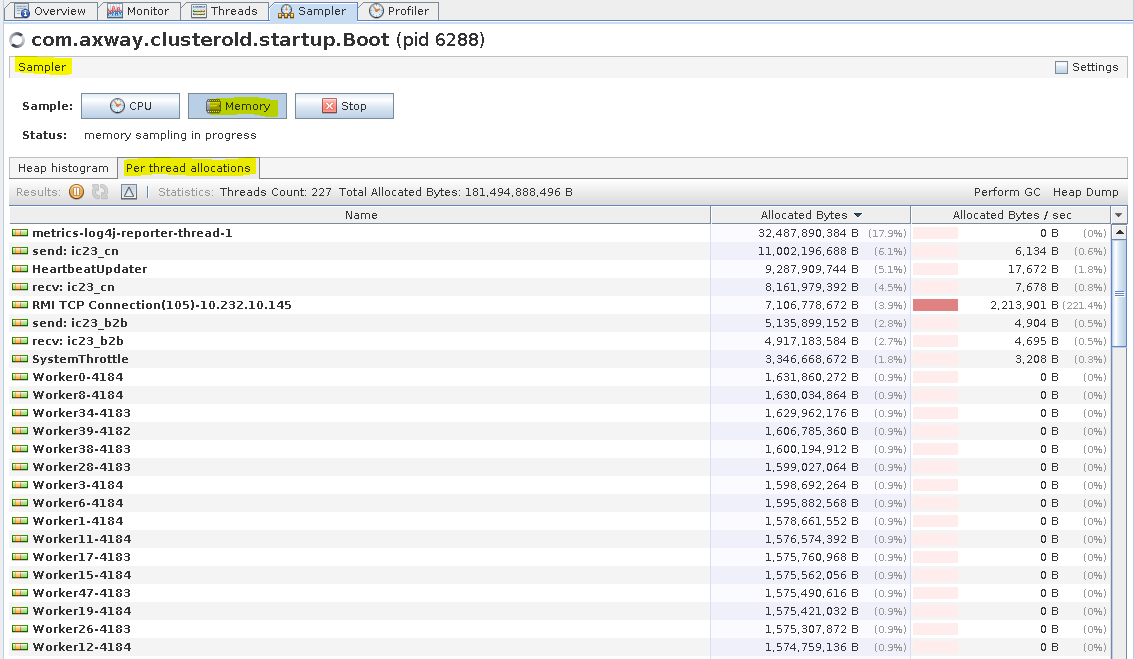
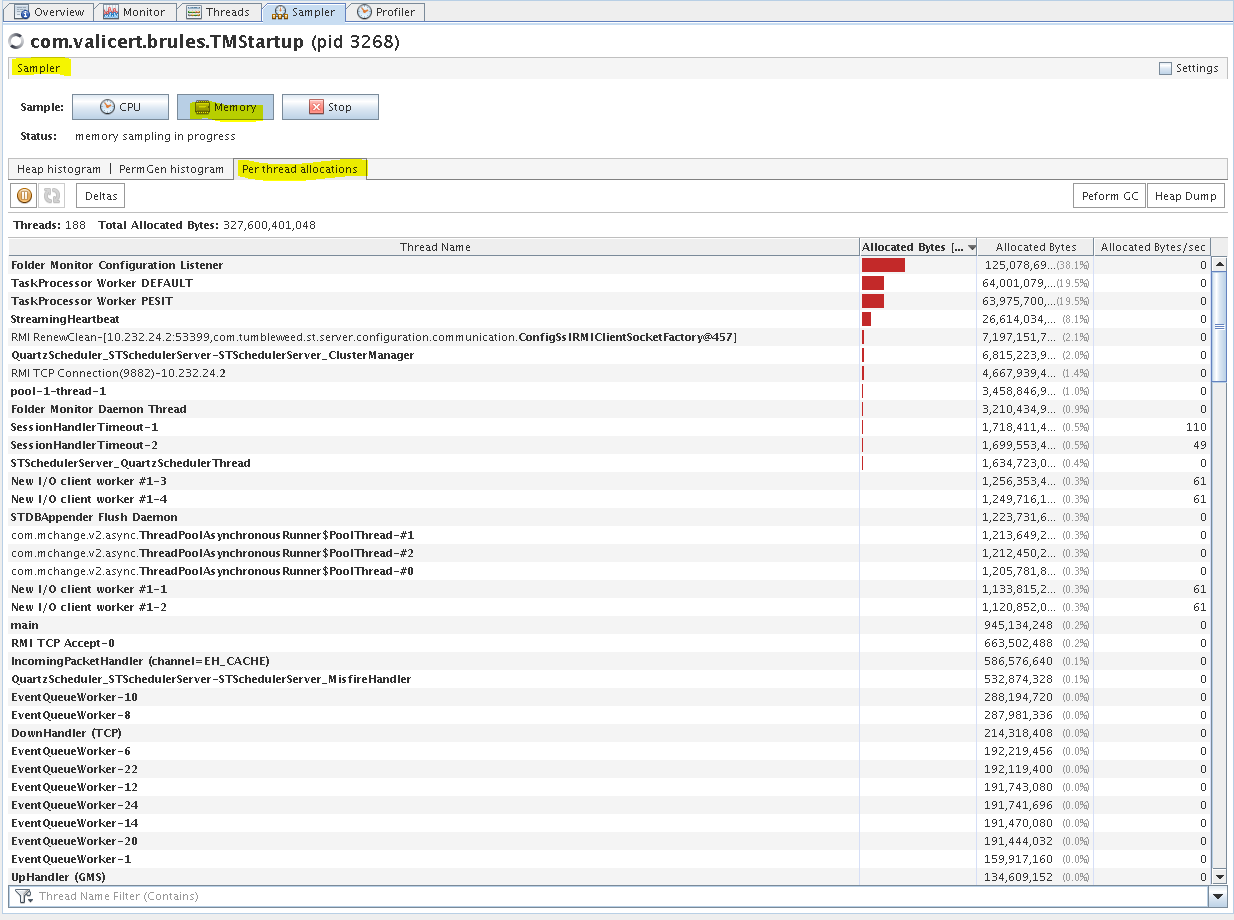
You can monitor CPU and memory usage in the Sampler tab. It allows you to see the resource consumption per Class and and per Thread. The sampler regularly takes a dump of all the threads being executed and generates a report how much CPU time each method spends.
B2Bi TE - Sampler tab (CPU Samples per class)
ST TM - Sampler tab (CPU Samples per class)
B2Bi TE - Sampler tab (Threads CPU time)
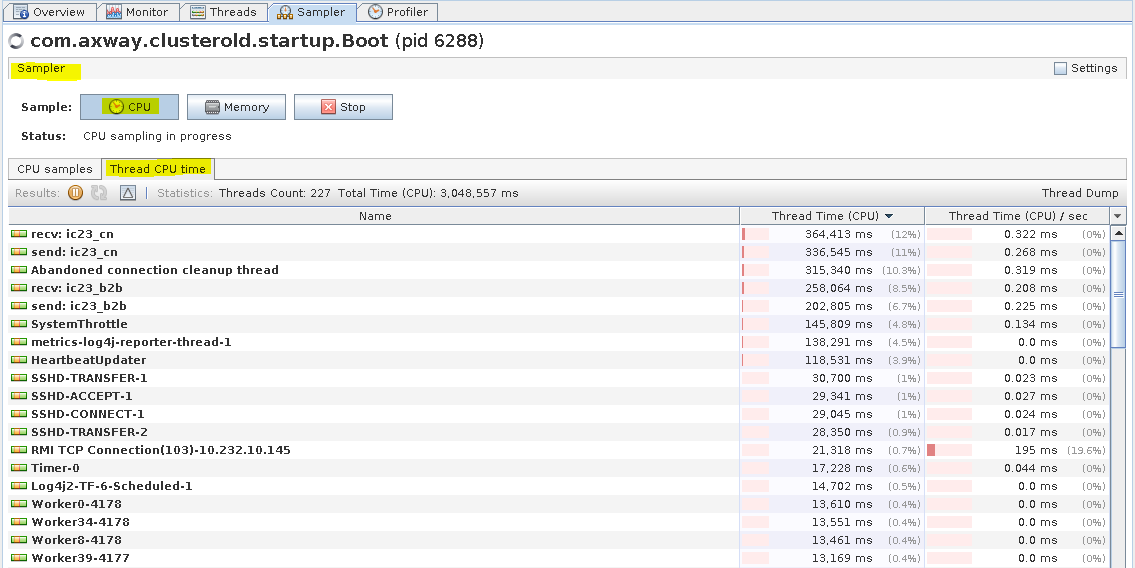
ST TM - Sampler tab (Threads CPU time)

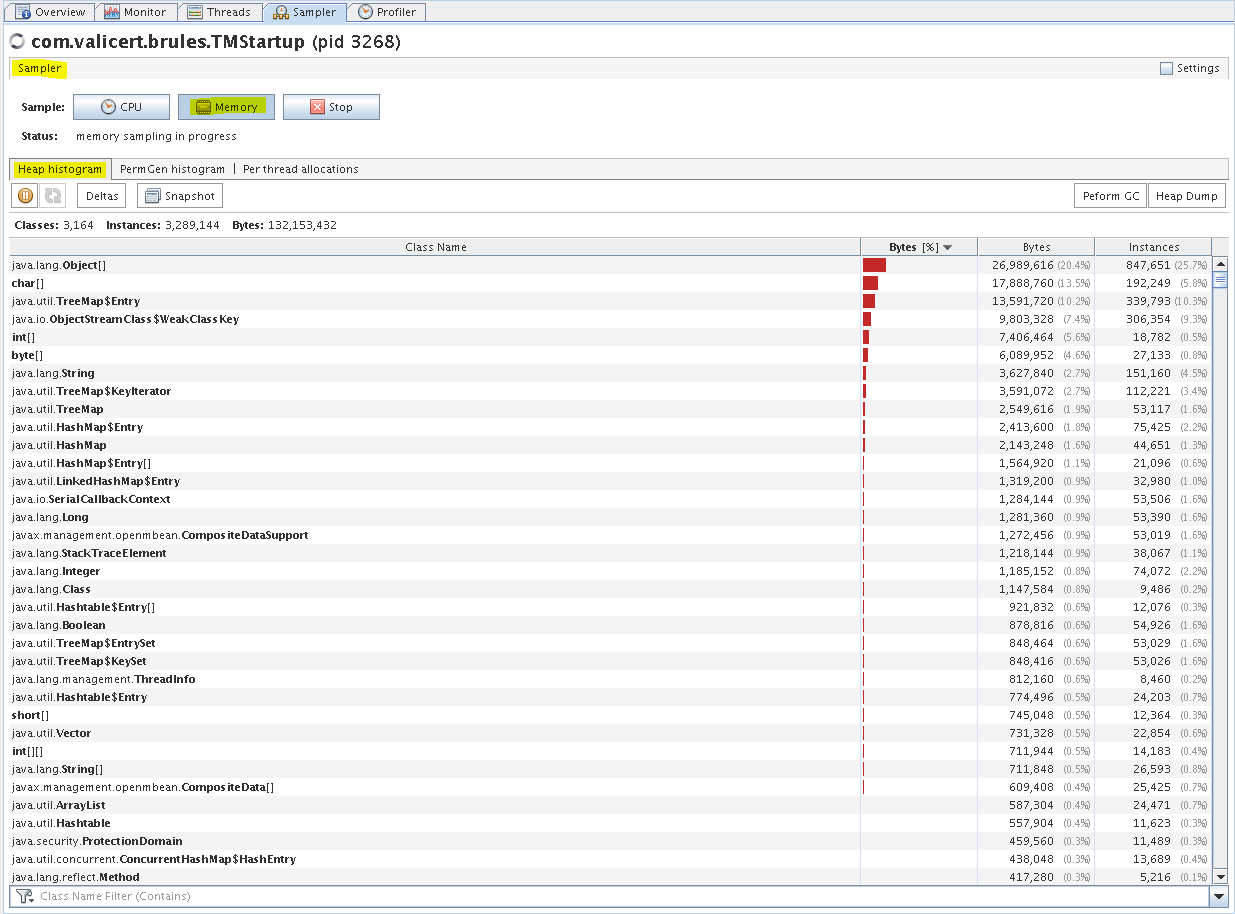
B2Bi TE - Sampler tab (Heap histogram)

ST TM - Sampler tab (Heap histogram)
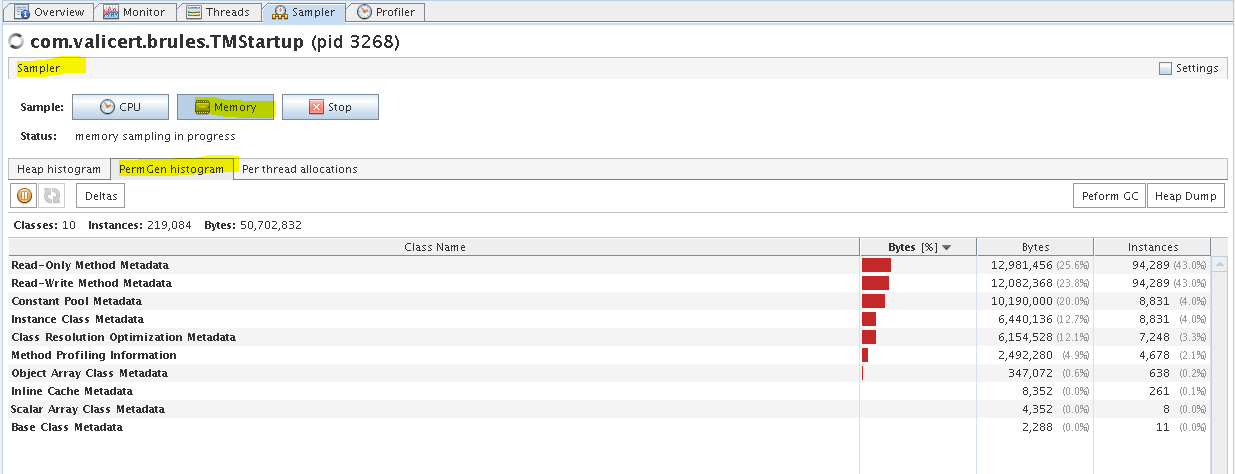
ST TM - Sampler tab (PermGen histogram)
B2Bi TE - Sampler tab (Per thread allocations)
ST TM - Sampler tab (Per thread allocations)
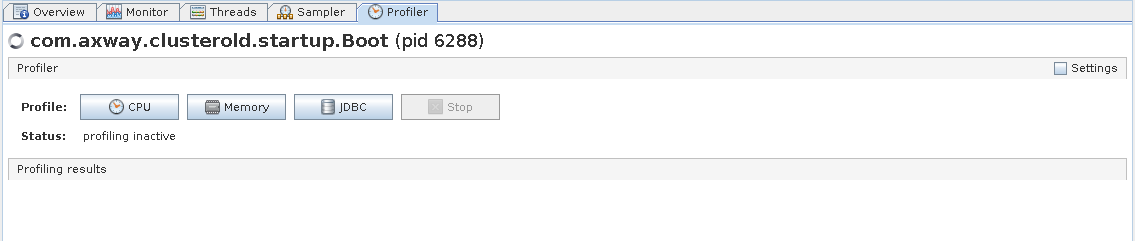
The Profiler tab with Local Monitoring on Linux. The below pictures are just for reference.
B2Bi TE - Profiler tab
ST TM - Profiler tab

Setup
VisualVM requires GUI (X server) to display the information and it can be used for Local or Remote Monitoring.
Local Monitoring
Local monitoring with Direct VM connection
On Windows, the Axway services (JVMs) for ST, B2Bi/Interchange/Activator are not accessible with direct VM connection and you need to configure port for local monitoring. See the section Local monitoring with TCP port below for steps how to do it.
On Linux, the Axway application services are JVMs, which are exposed as network sockets (named pipes), which allows VisualVM to connects to all available JVMs without additional configuration. All you'd need to run VisualVM is an X server and a JDK.
Axway Appliances do not have an X server installed and the Axway repositories do not host any packages for installing and configuring an X server. It is not practically possible to use local monitoring on an Axway Appliance.
The instructions below are assuming Linux server running the Axway applications (ST, B2Bi). If a monitor is attached to the server, it can be used to view the VisualVM tools with a console X server on the actual application server (Linux), via VNC or with X11forwarding. Here are details how to use it with X11forwarding to your Windows computer.
Download, install, and start Xming on your Windows machine from here: Xming at SourceForge
Download and install / start PuTTY on your Windows machine from here: Putty
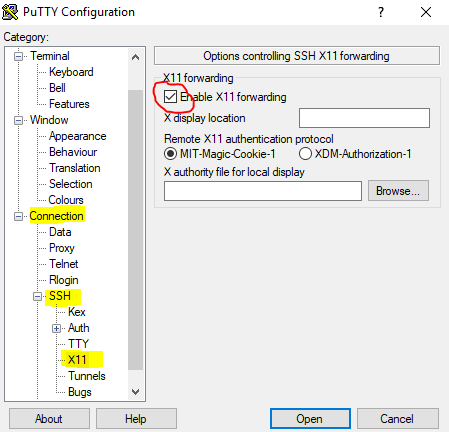
Enable X11forwarding when you configure the remote session in PuTTY.
After connecting with PuTTY to the Linux machine check if the forwarding is working with the command echo $DISPLAY. The result should be a non-empty string starting with localhost like in this example localhost:11.0
If echo $DISPLAY returns an empty string check if X server is installed on the Linux machine and if X11forwarding is enabled in the Linux SSH server. For OpenSSH set X11Forwarding yes in the /etc/ssh/sshd_config file and restart the SSH server.
Download and extract JDK 8 (jdk-8u201-linux-x64.tar.gz or newer) from Oracle's site (see a link above).
Start jvisualvm from the Java's bin directory. Here is example with JDK version 1.8.0_201 (Build 1390-170114):
cd /root/jdk1.8.0_201/bin
./jvisualvm
Java VisualVM started locally on openSUSE with B2Bi 2.8
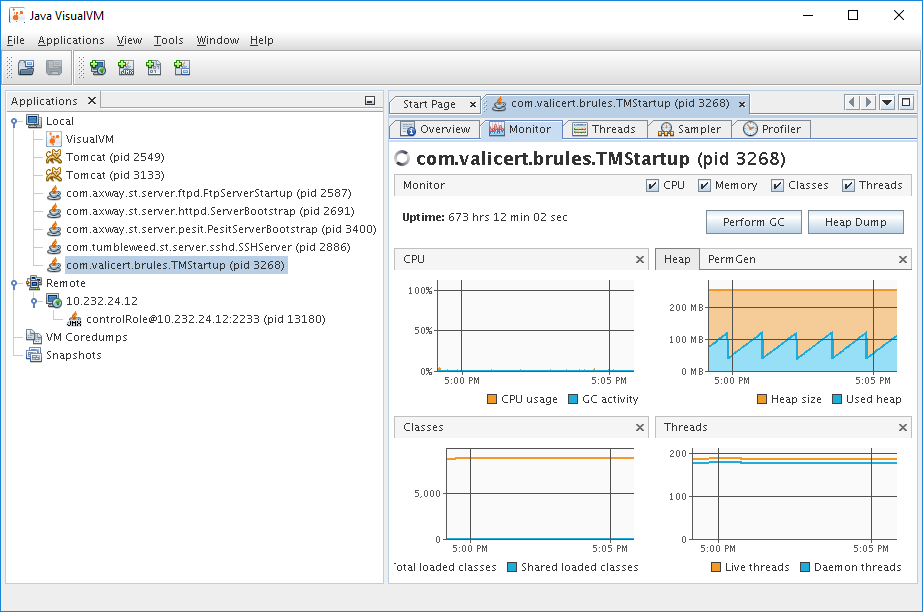
Monitor tab for the Transaction Manager (TM) server (pid 3268) after it was running for some time on a non-busy lab VM. Java VisualVM started locally on SLES 11 SP4 with ST 5.2.1 SP4.
If you would like to use the latest version of VisualVM from GitHub, you will need to install the JDK on Linux or just set the environment variable for JAVA_HOME to point to the extracted JDK. Here is an example with the current versions of JDK and VisualVM:
export JAVA_HOME=/root/jdk1.8.0_201
export PATH=$JAVA_HOME/bin:$PATH
cd /root/visualvm_142/bin
./visualvm
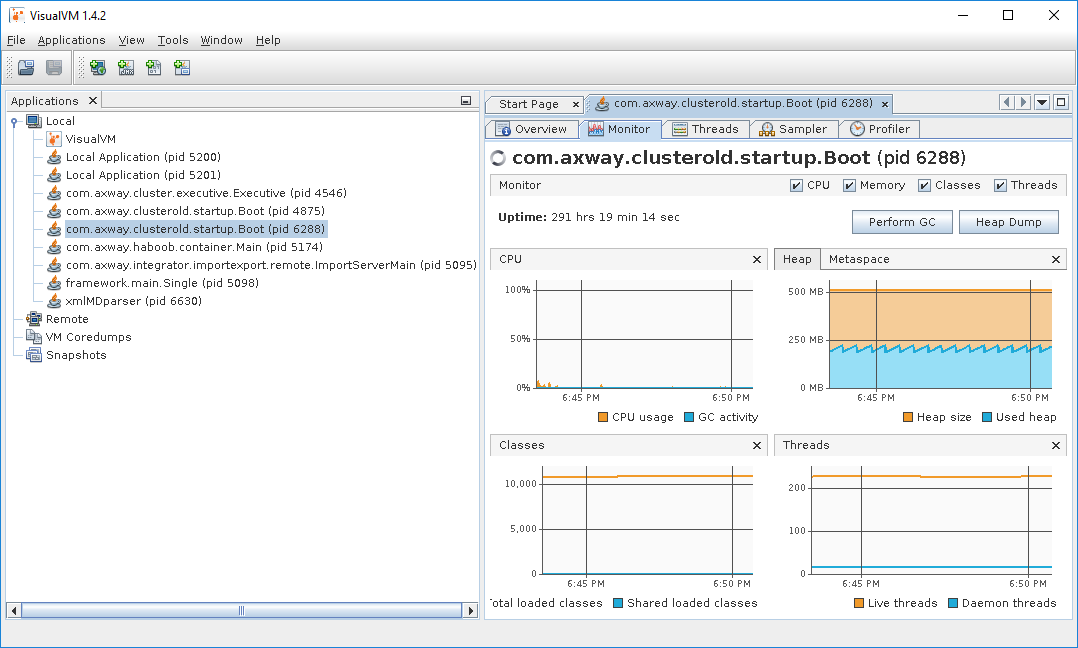
Monitor tab for Trading Engine (TE) server (pid 6288) after it was running for some time on a non-busy lab VM. VisualVM from GitHub was started locally on OpenSUSE with B2Bi 2.8
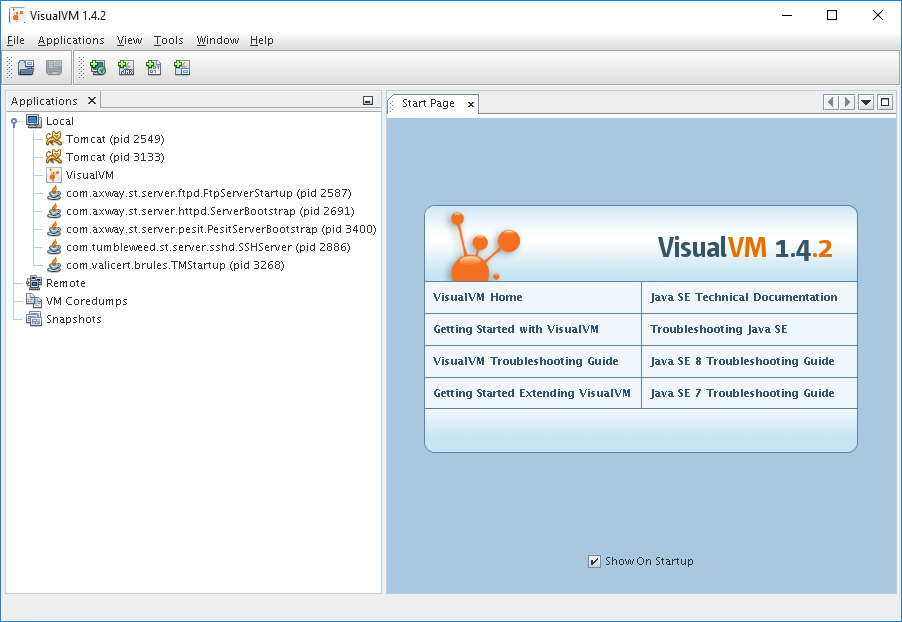
VisualVM from GitHub started locally on SLES 11 SP4 with ST 5.2.1 SP4
Local monitoring with opening a TCP port
The following instructions are valid for both Linux and Windows JVMs.
Limitation: On Windows, for security reasons, local monitoring and management is only supported if your default Windows temporary directory is on a file system that supports setting permissions on files and directories (for example, on an NTFS file system). It is not supported on a FAT file system that provide insufficient access control.
For ST 5.5 you need to add the following JVM options in file <FILEDRIVEHOME>/conf/STStartScriptsConfig. The example below is for Transaction Manager. For other ST services please check SecureTransport 5.5 Administrator Guide - Advanced protocol server configuration.
TM_JAVA_OPTS="-Dcom.sun.management.jmxremote.port=2233 $TM_JAVA_OPTS"
TM_JAVA_OPTS="-Dcom.sun.management.jmxremote.rmi.port=2233 $TM_JAVA_OPTS"
TM_JAVA_OPTS="-Dcom.sun.management.jmxremote.authenticate=false $TM_JAVA_OPTS"
TM_JAVA_OPTS="-Dcom.sun.management.jmxremote.ssl=false $TM_JAVA_OPTS"
TM_JAVA_OPTS="-Djava.rmi.server.hostname=localhost $TM_JAVA_OPTS"
TM_JAVA_OPTS="-Dcom.sun.management.jmxremote.local.only=true $TM_JAVA_OPTS"
For older ST versions prior to ST 5.5 or other Axway products you need to add the following JVM options in the application's startup script (one additional line). For Transaction Manager in ST this file is the start_tm_console.
JAVA_OPTS="-Dcom.sun.management.jmxremote.port=2233 -Dcom.sun.management.jmxremote.rmi.port=2233 -Dcom.sun.management.jmxremote.authenticate=false -Dcom.sun.management.jmxremote.ssl=false -Djava.rmi.server.hostname=localhost -Dcom.sun.management.jmxremote.local.only=true $JAVA_OPTS"
The above options open TCP port 2233 on all interfaces (0.0.0.0) on the server, but the JMX connection is possible only from the server itself.
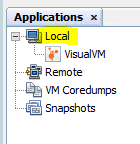
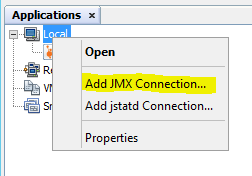
Start VisualVM on the server. Right click on Local.
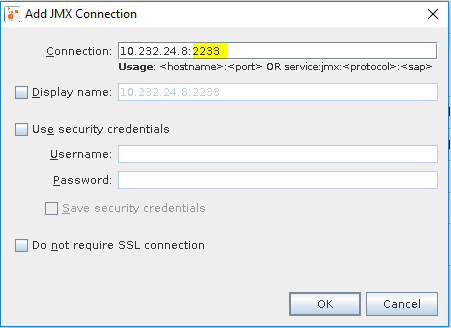
Select Add JMX Connection.
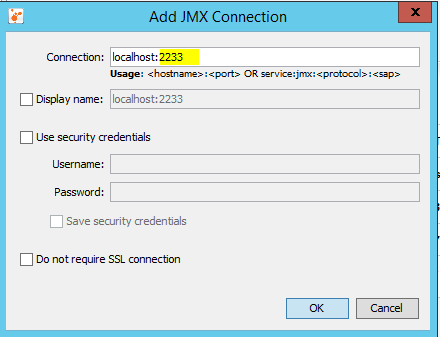
Type the port which was configured on JVM. In our case port 2233.
If everything is configured properly you should see a new entry in the Local tree. Double click on the new entry to start monitoring.
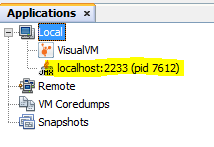
Double click on the new entry to start monitoring.
Remote Monitoring
Remote monitoring without authentication and SSL
Remote monitoring is similar to local monitoring with opening a TCP port. It is useful for testing environments.
For ST 5.5 you need to add the following JVM options in file <FILEDRIVEHOME>/conf/STStartScriptsConfig. The example below is for Transaction Manager. For other ST services please check SecureTransport 5.5 Administrator Guide - Advanced protocol server configuration.
TM_JAVA_OPTS="-Dcom.sun.management.jmxremote.port=2233 $TM_JAVA_OPTS"
TM_JAVA_OPTS="-Dcom.sun.management.jmxremote.rmi.port=2233 $TM_JAVA_OPTS"
TM_JAVA_OPTS="-Dcom.sun.management.jmxremote.authenticate=false $TM_JAVA_OPTS"
TM_JAVA_OPTS="-Dcom.sun.management.jmxremote.ssl=false $TM_JAVA_OPTS"
For older ST versions prior to ST 5.5 or other Axway products you need to add the following JVM options in the application's startup script (one additional line). For Transaction Manager in ST this file is the start_tm_console.
JAVA_OPTS="-Dcom.sun.management.jmxremote.port=2233 -Dcom.sun.management.jmxremote.rmi.port=2233 -Dcom.sun.management.jmxremote.authenticate=false -Dcom.sun.management.jmxremote.ssl=false $JAVA_OPTS"
The above options open TCP port 2233 on all interfaces (0.0.0.0) on the server for remote access with no authentication and no security. You will also need to open port 2233 on the firewall on the server.
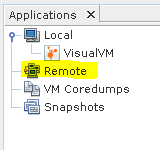
Start VisualVM on any machine with access to server IP address. Right click on the Remote.
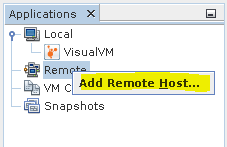
Select Add Remote Host.
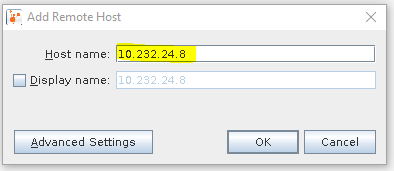
Type the IP address of the server.
Right click on the new entry and select Add JMX Connection.
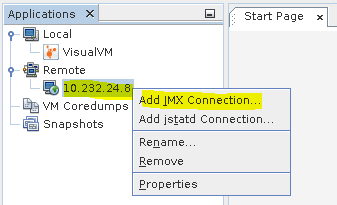
Type the port which was configured on JVM. In our case port 2233.
If everything is configured properly you should see new entry in the Remote tree under the server's IP address. Double click on the new entry to start monitoring.
Remote monitoring with authentication and SSL
You can configure authentication with user/pass and SSL separately. Below you could find instructions how to set them both together.
Configure authentication for remote monitoring
The simplest way to set authentication is to use predefined roles:
- Control role - Full access to VisualVM's capabilities, everything described so far
- Monitor role – only the Monitor tab can be used and it is not possible to perform Heap dumps or GC
Create a file <FILEDRIVEHOME>/jre/conf/management/jmxremote.password (for ST versions before 5.5 with Oracle Java the path is <FILEDRIVEHOME>/jre/lib/management/) with the following content (2 lines):
controlRole changeme
monitorRole changeme
The first column is the username (controlRole or monitorRole) and second column is the password (changeme).
The read access must be restricted for the jmxremote.password file:
- On Linux set the permissions to 600
- On Windows set the permissions to 600 via Cygwin and restrict the access to the file only to the SYSTEM user and the Administrators group.
To activate the authentication set com.sun.management.jmxremote.authenticate to true.
Set SSL connection for remote monitoring
To set SSL connection you need a digital certificate with a private key in a keystore format. Supported keystore types are: JKS, JCEKS, and PKCS12. The instructions below describe how to generate a self-signed certificate and use it for securing the JMX connection with SSL. Also, you will need a truststore for VisualVM to trust and validate the self-signed certificate otherwise you will not be able to establish SSL connection with the JMX server from VisualVM.
Generate a self-signed certificate with a private RSA key with size 2048 using openssl:
openssl req -x509 -nodes -days 1095 -newkey rsa:2048 -keyout jmxremote.key -out jmxremote.crt
Follow the prompts and put the relevant information inside the certificate.
Create a PKCS12 keystore with new certificate and private key:
openssl pkcs12 -export -out jmxremote.p12 -inkey jmxremote.key -in jmxremote.crt
You can NOT skip setting up a password for the PKCS12 keystore. Keystores without password can not be used for JMX connection. Always set a password for keystores!
Convert certificate from PEM to DER format to be able to build a truststore.
openssl x509 -outform der -in jmxremote.crt -out jmxremote.der
Create a truststore from the certificate and trust it.
keytool -import -alias jmxcert -keystore jmxkeystore.dat -file jmxremote.der -storepass changeme
The alias specified is not important, you can use any alias.
Answer yes to the question Trust this certificate? [no]:.
Now you are to setup SSL connection with authentication. On the JMX server you will need the keystore file jmxremote.p12 and on the machine with VisualVM you will need the truststore jmxkeystore.dat.
Create a file <FILEDRIVEHOME>/jre/conf/management/sslConfig (for ST versions before 5.5 with Oracle Java the path is <FILEDRIVEHOME>/jre/lib/management/) with the following content (3 lines):
javax.net.ssl.keyStore=/<path>/jmxremote.p12
javax.net.ssl.keyStorePassword=changeme
javax.net.ssl.keyStoreType=PKCS12
For ST 5.5 you need to add the following JVM options in file <FILEDRIVEHOME>/conf/STStartScriptsConfig. The example below is for Transaction Manager. For other ST services please check SecureTransport 5.5 Administrator Guide - Advanced protocol server configuration. Note that we explicitly add a limited set of cipher suites to work around the issue with implementation of elliptic curves curve25519 (X25519) and curve448 (X448) in BouncyCastle FIPS (default security provider used in ST 5.5).
TM_JAVA_OPTS="-Dcom.sun.management.jmxremote.port=2233 $TM_JAVA_OPTS"
TM_JAVA_OPTS="-Dcom.sun.management.jmxremote.rmi.port=2233 $TM_JAVA_OPTS"
TM_JAVA_OPTS="-Dcom.sun.management.jmxremote.authenticate=true $TM_JAVA_OPTS"
TM_JAVA_OPTS="-Dcom.sun.management.jmxremote.ssl=true $TM_JAVA_OPTS"
TM_JAVA_OPTS="-Dcom.sun.management.jmxremote.ssl.config.file=/jre/conf/management/sslConfig $TM_JAVA_OPTS"
TM_JAVA_OPTS="-Dcom.sun.management.jmxremote.registry.ssl=true $TM_JAVA_OPTS"
TM_JAVA_OPTS="-Dcom.sun.management.jmxremote.ssl.enabled.cipher.suites=TLS_RSA_WITH_AES_128_GCM_SHA256,TLS_RSA_WITH_AES_256_GCM_SHA384,TLS_RSA_WITH_AES_128_CBC_SHA,TLS_RSA_WITH_AES_128_CBC_SHA256,TLS_RSA_WITH_AES_256_CBC_SHA,TLS_RSA_WITH_AES_256_CBC_SHA256,TLS_DHE_RSA_WITH_AES_128_GCM_SHA256,TLS_DHE_RSA_WITH_AES_256_GCM_SHA384,TLS_DHE_RSA_WITH_AES_128_CBC_SHA,TLS_DHE_RSA_WITH_AES_128_CBC_SHA256,TLS_DHE_RSA_WITH_AES_256_CBC_SHA,TLS_DHE_RSA_WITH_AES_256_CBC_SHA256 $TM_JAVA_OPTS"
For older ST versions prior to ST 5.5 or other Axway products you need to add the following JVM options in the application's startup script (one additional line). For Transaction Manager in ST this file is the start_tm_console.
JAVA_OPTS="-Dcom.sun.management.jmxremote.port=2233 -Dcom.sun.management.jmxremote.rmi.port=2233 -Dcom.sun.management.jmxremote.authenticate=true -Dcom.sun.management.jmxremote.ssl=true -Dcom.sun.management.jmxremote.ssl.config.file=<FILEDRIVEHOME>/jre/(conf||lib)/management/sslConfig -Dcom.sun.management.jmxremote.registry.ssl=true $JAVA_OPTS"
The above options open TCP port 2233 on all interfaces (0.0.0.0) on the server for remote access with authentication and SSL security. You will also need to open port 2233 on the firewall on the server.
For ST you can place the jmxremote.p12 file in the ${FILEDRIVEHOME}/bin folder next to the startup start_tm_console script . In this case you will not need to specify path in the JVM option javax.net.ssl.keyStore (use relative path instead, i.e. -Djavax.net.ssl.keyStore=jmxremote.p12). Note that ST ADMIN and ST AS2 daemon are using Tomcat server which is not allowing to use relative path.
To connect securely with VisualVM you need to start the VisualVM with JVM parameters (options) to use the generated truststore.
- On Linux with JDK use:
./jvisualvm -J-Djavax.net.ssl.trustStore=/path/jmxkeystore.dat -J-Djavax.net.ssl.trustStorePassword=changeme
- On Windows with JDK create shortcut with target:
"C:\Program Files\Java\jdk1.8.0_201\bin\jvisualvm.exe" -J-Djavax.net.ssl.trustStore=C:\path\jmxkeystore.dat -J-Djavax.net.ssl.trustStorePassword=changeme
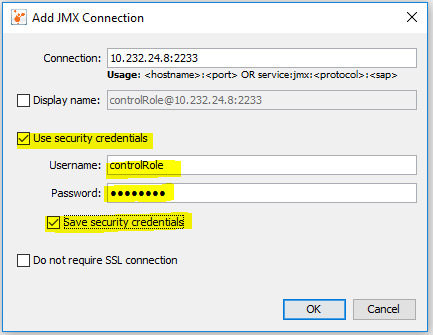
If everything is configured properly you should be able to create JMX connection with the remote server similar to what was described in point Remote monitoring without authentication and SSL above. The only difference is that you need to specify user and password (see below). Local monitoring with authentication and SSL is also possible. If you use localhost SSL should be turned off (see below).
JMX connection with authentication
JMX connection on localhost
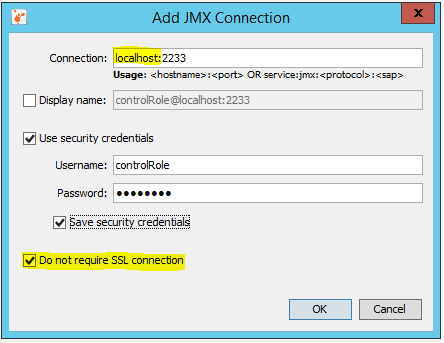
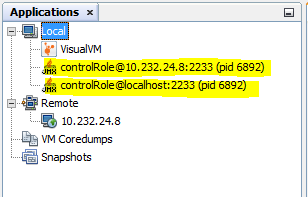
Local connections via localhost (no SSL) and via external IP (with SSL) with authentication
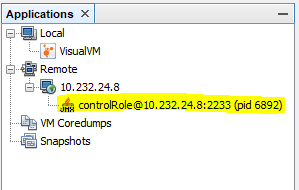
Remote connection with SSL and authentication
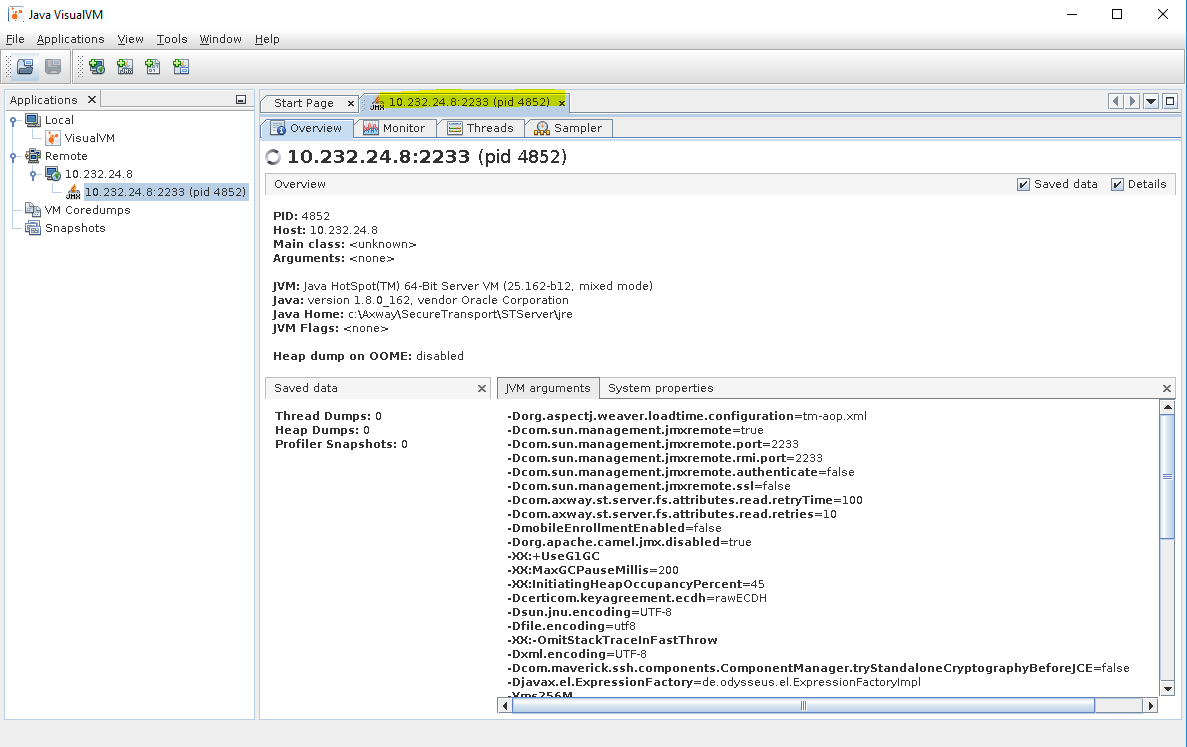
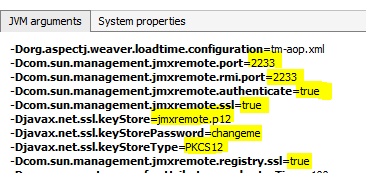
You can check the JVM options on the server in the Overview tab when opening a JMX connection for monitoring
Some combinations of versions of VisualVM from GitHub and different JDK versions from Oracle or OpenJDK have issue with remote monitoring with SSL. For unknown reason VisualVM does not initiate TLS connection (no Client Hello message) and connection with JMX port secured with SSL is not possible. In such case use different JDK. Download a zip version of JDK from internet. Unzip it at any desired path and set it to VisualVM by command line parameter --jdkhome /path to jdk/. Please check VisualVM - Command Line Options
Plugins
VisualVM supports several plugins. Two of them are quite useful and available for both Java VisualVM and the latest version from GitHub.
VisualVM-Security plugin
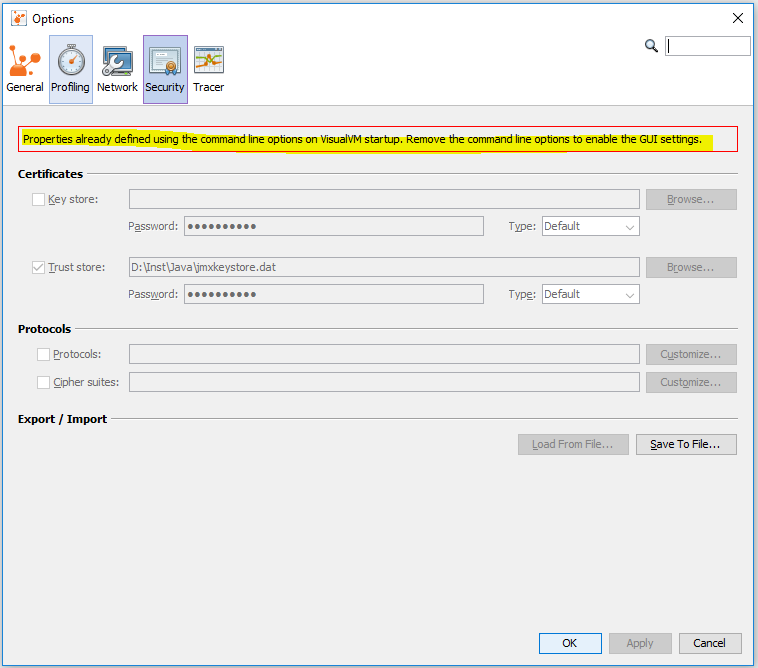
This plugin provides a GUI for setting the standard system properties controlling the SSL/TLS connections in VisualVM. Setting the properties using the plugin is equivalent to providing the properties on the command line. However, the properties provided on the command line take precedence and if set the GUI editing is disabled.
When the VisualVM-Security plugin is installed in VisualVM, a new tab Security appears in the Options. You can set the truststore there instead of using JVM options when starting VisualVM.
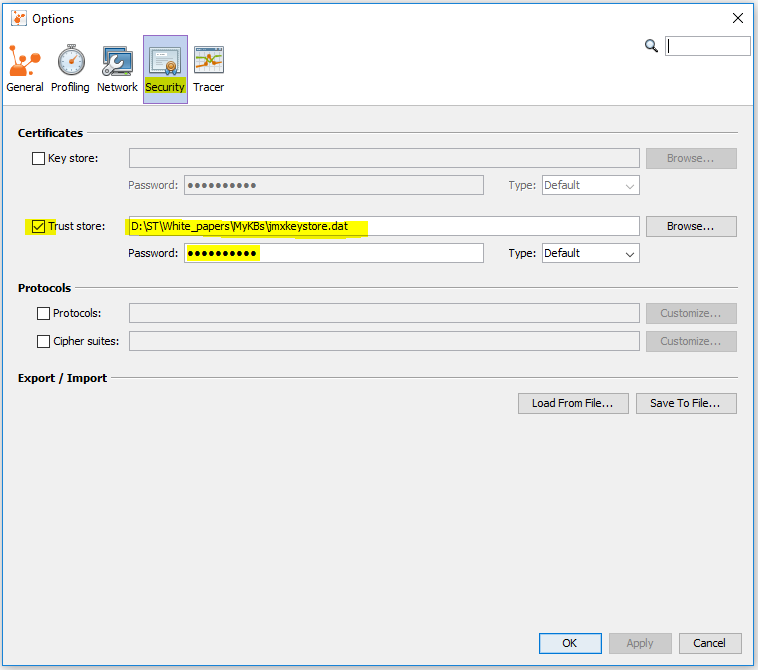
If you set the truststore with JVM options when starting VisualVM you cannot use the Security plugin configuration.
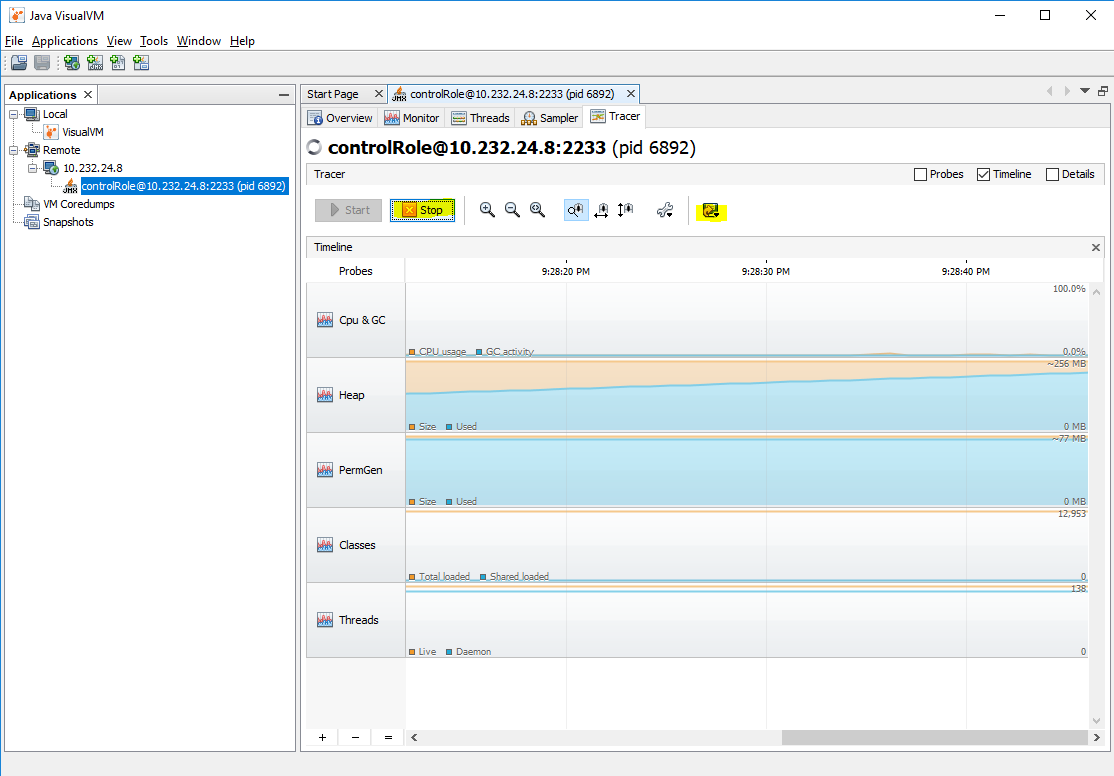
Tracer plugin
VisualVM does not provide capability to log the information from the Monitor and Sampler tabs. You can make screenshots periodically. The Tracer plugin, however, allows you to save the information from different probes and here are shown only the Tracer-Monitor Probes. This plugin provides the same metrics as the Monitor tab and enables the manual export of data.
Tracer plugins variants

When the Tracer-Monitor Probes plugin is installed in VisualVM, a new tab Tracer appears in the monitoring page for JMX connection.
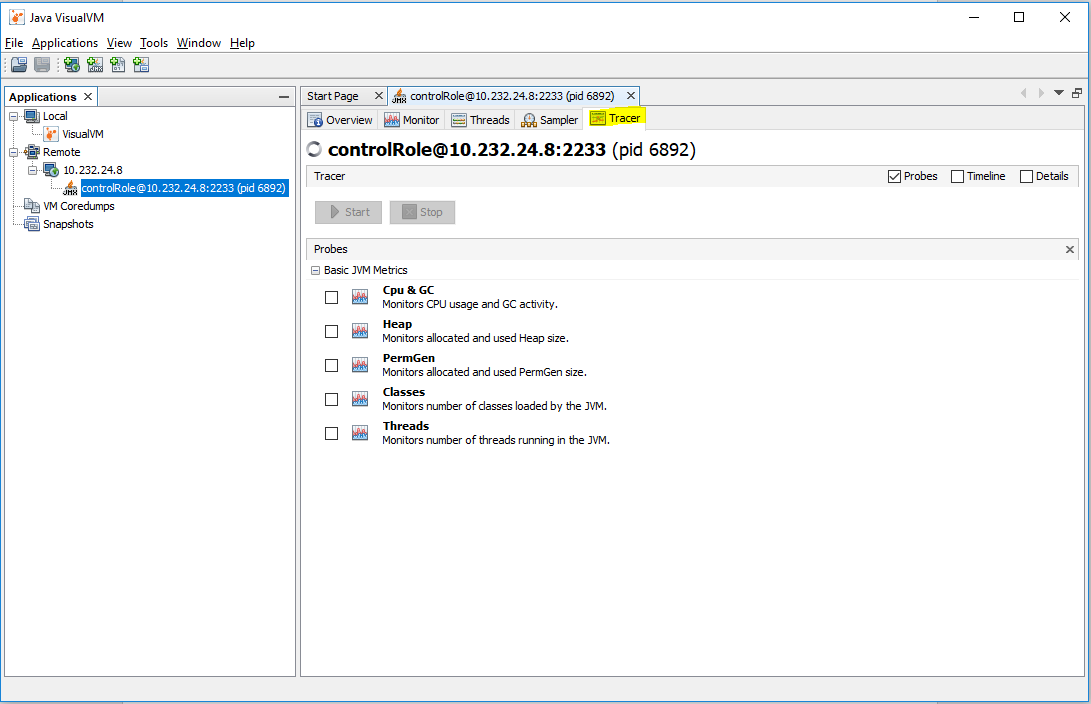
Select a specific or all probes from the Start button and start monitoring
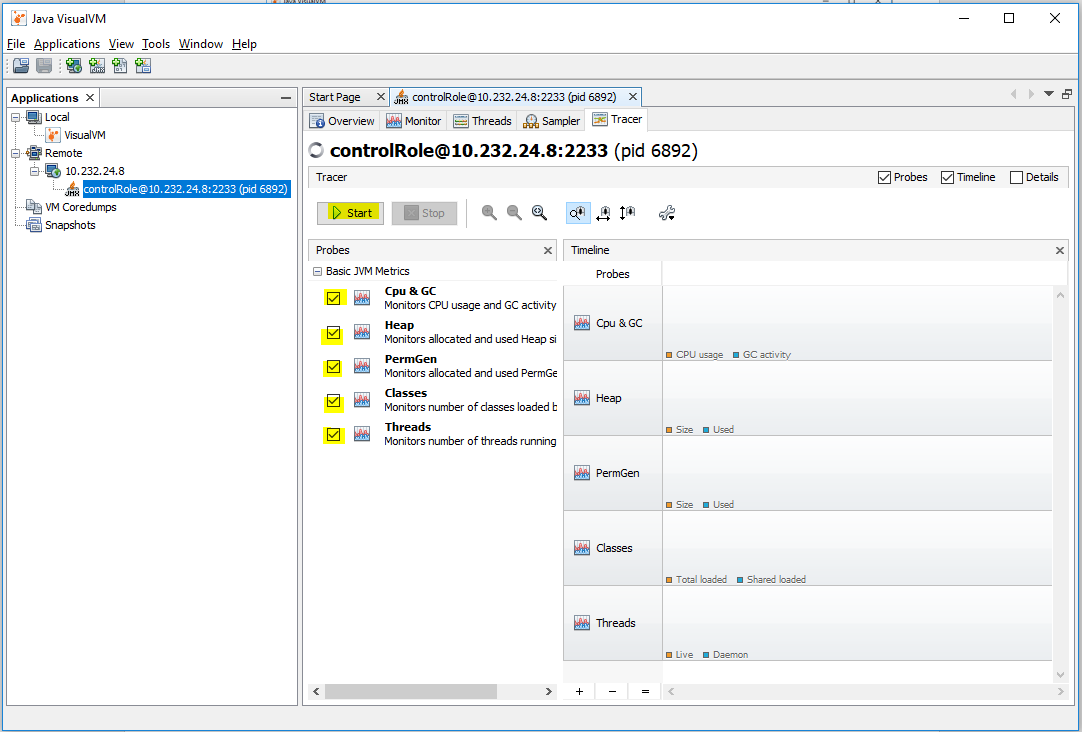
When monitoring is running on the tracer you have the ability to export the data. It is recommended to do the export after pressing the Stop button because the output may not be complete while the tracer is running.
Enjoy using the VisualVM tool!
Evgeni Evangelov