KB Article #66147
Configure SSH public key authentication in SecureTransport
This article gives an example on how to set up public key (SSH) authentication for users, connecting to SecureTransport.
Table of contents
- Before you begin
- The SSH keys
- Configure SecureTransport for key-authentication
- Testing the authentication
Before you begin
SSH key authentication, contrary to the popular belief, requires that the client (user) holds the private key, while the server holds the corresponding public key. Using this key, the server is able to verify that the presented private key is part of the same key-pair and the authentication is successful.
As a rule of thumb, only one person should have access to the private key, which is why it is recommended that the user creates the key-pair and sends the public part to the server to be imported and used for the authentication.
In the scenario where a user connects to SecureTransport, the user is the client (holds the private key), and ST is the server, holding the public key.
The SSH keys
There are two common ways to get a key-pair for the authentication - generate them in ST, or obtain them from the partner who is going to connect to ST. The second option is the recommended one, since the partner will be the only party holding the private key at all times, while this is not the case in the first option.
Generating the keys in SecureTransport
In this approach, the key pair is generated in ST, under the respective account, which the user will use to connect to ST. The exact page where this is to be done is Certificates → Login Certificates.
When the key-pair is generated, you will be asked to store it as a backup. Do this now and store the exported file to be sent to your user later.
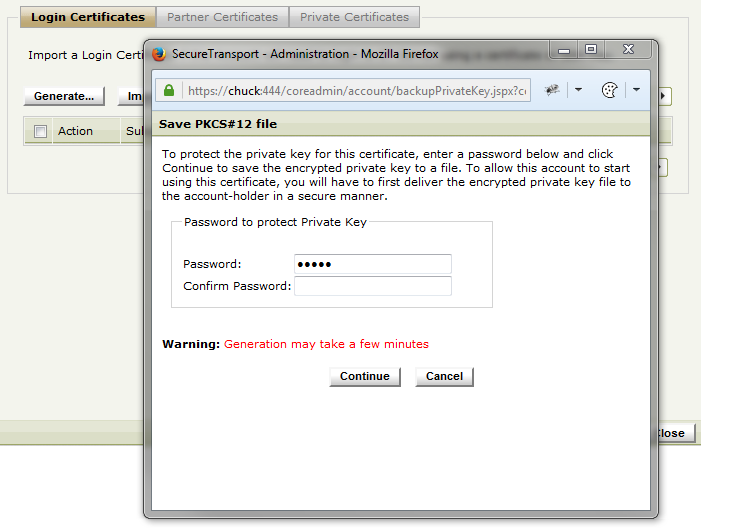
Key export prompt
If the key-pair is not saved at this point, SecureTransport will delete the private key at the end of the generation and will keep the public key only. In result, you will not be able to obtain the private key anymore and a new key-pair would be needed.
When exporting the key-pair, do add password and do make it longer than 8 characters. Some systems refuse to import keys without password, or with shorter passwords.
Once generated the public key will appear in the user list as shown below
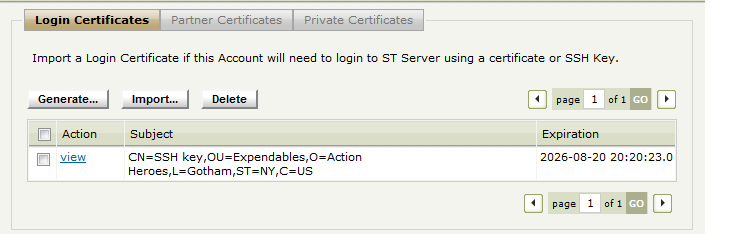
The SSH key in the account's list of keys
As next step, send the exported key-pair to your partner, so they import it in their system.
The file with the exported key-pair is a PKCS#12 X509 capsule. Some systems extract the SSH key from the capsule on the fly and no conversion would be required. Other systems require specific SSH format, and the .p12 capsule and the keys it contains will have to be converted. Refer to the documentation of the respective software for information how to import the keys.
Receiving the public key from the partner/user
This is the recommended approach, due to the above mentioned rule for the public and private keys. In this approach, the user generates the key-pair and sends the public key to the ST administrator.
A common way to generate key-pairs on Linux/UNIX is with the ssh-keygen utility:
# ssh-keygen -t rsa
This command will produce the two keys - private and public - under the OS user's home folder, in the .ssh subfolder. For example, for the user "root" the keys will be in /root/.ssh. The two keys are as follows:
id_rsa - this is the private key
id_rsa.pub - this is the public key
The partner should send you the id_rsa.pub file, which then has to be imported under the respective account, in the Certificates → Login Certificates tab:
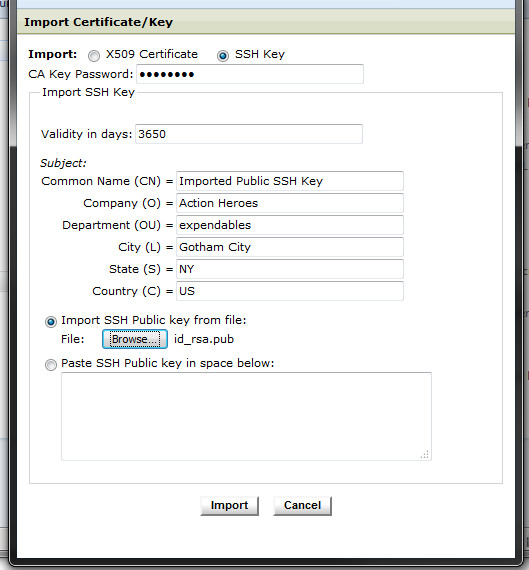
Import the SSH public key in the account's list of keys
The SecureTransport's Internal CA password will be required for the import.
Configure SecureTransport for key-authentication
Once the keys are in place, SecureTransport should be configured to accept key-authentication.
For versions ST 5.3.6 and later
Starting with ST 5.3.6, configure the SSH key authentication with the steps below:
Go to Authentication → Login Settings in the Admin UI
Enable the Certificate checkbox
Set the Client Certificate Settings option to Optional or Required for the SSH protocol
Required: ST will accept only keys as authentication method
Optional: ST will accept key or username/password for authentication
Restart the SSH service from Operations → Server Control page
(optional) If there is Edge server in use, repeat the above steps on the Edge as well
In a clustered setup, always import the keys and configure the key-authentication in the Primary node of the cluster.

SSH authentication configuration in ST 5.3.6 and later
For versions before ST 5.3.6
Older ST versions were configured differently. Follow the steps below:
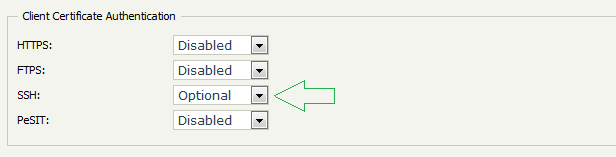
Go to Access → Secure Sockets Layer in the Admin UI
Set the Client Certificate Authentication option to Optional or Mandatory for the SSH protocol
Mandatory: ST will accept only keys as authentication method
Optional: ST will accept key or username/password for authentication
Restart the SSH service from Operations → Server Control page
(optional) If there is Edge server in use, repeat the above steps on the Edge as well
In a clustered setup, always import the keys and configure the key-authentication in the Primary node of the cluster.
SSH authentication configuration before ST 5.3.6
Testing the authentication
When all is ready, the partner can test the authentication on Linux with the below command:
sftp -oPort=ST_SSH_SERVICE_PORT -oIdentityFile=/folder/id_rsa ST_USERNAME@ST_SERVER_ADDRESS
where ST_SSH_SERVICE_PORT, ST_USERNAME and ST_SERVER_ADDRESS should be replaced with their respective values. The path in this portion of the command - -oIdentityFile=/folder/id_rsa - should point to the private key file on the server.