KB Article #156707
Installing the Axway Custom BIOS on Axway appliances
Problem
After replacing a motherboard, Axway appliances' BIOS will be reset to Dell factory. In order to proceed with installing your Axway image, you will need to first install the Axway custom BIOS for your appliance model.
The instruction below assumes that you have connected and set up your DRAC card and you are able to login to the DRAC web administration. For more information on DRAC set up, please check the following article: Setting up remote access control on DELL systems
Resolution
1. Contact Axway Global Support, provide your service tag and appliance model and request a copy of the latest custom BIOS release.
2. Download the BIOS file (usially .ima, .img or .iso file, depending on your appliance model) to your workstation, as provided by Axway Global Support.
3. Open the DRAC page with Internet Explorer and add it to the Trusted Sites Zone

4. Log in to the DRAC Page and navigate to Media - > Configuration. Ensure that Plug-in Type is set to “Native”
5. Click on Virtual Media. If prompted, accept to install the Active-X plug-in. Scroll down to Floppy/USB Drive
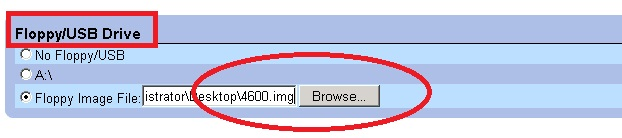
6. Browse to your Axway custom BIOS file, select it, then scroll down and click ‘’connect’’
7. In the DRAC menu go to “Console” and launch the console. Reboot the appliance.
8. When the appliance starts up, click F11 to enter boot menu
9. Select “Virtual Floppy” from the boot options and hit Enter

10. Please wait until the installation completes. Appliance will reboot and the Axway Custom BIOS release will be installed.