KB Article #180623
Amazon S3: Configuring the Amazon S3 connector for SecureTransport
Overview
The Amazon S3 Connector enables Axway SecureTransport (ST) to exchange files with Amazon Cloud S3 Buckets or custom S3 provider endpoints. It is deployed as a Transfer Site plugin to an existing ST installation. Once deployed, it provides a new Protocol - S3 to the list of available protocols in the Add New Transfer Site page for User Accounts.
An introduction to general Transfer Site configuration is available in the SecureTransport’s Administration Guide under section Manage accounts: Transfer sites. [ST 5.5 Administrator Guide]
Prerequisites
An Amazon Account with S3 privileges or access to a third-party S3 storage
Network connectivity with DNS resolution to the S3 storage endpoint (e.g. to *.amazonaws.com)
Minimum SecureTransport version: 5.5-20220929
Download
The Amazon S3 Connector for SecureTransport installation package can be downloaded from the AMPLIFY Repository or Axway Support Portal.
Installation
To install the Amazon S3 Connector for SecureTransport, perform the following steps on all SecureTransport Server nodes:
Delete the following files/folders associated with the previous version of this step (if they exist):
<FILEDRIVEHOME>/plugins/transferSites/Axway-AmazonS3Connector.jar<FILEDRIVEHOME>/plugins/transferSites/amazon<FILEDRIVEHOME>/plugins/transferSites/axway-site-s3.jar<FILEDRIVEHOME>/plugins/transferSites/axway-site-s3
The existing configurations in ST will be preserved.
Extract the securetransport-plugins-site-s3-<plugin_version>.zip into <FILEDRIVEHOME>/plugins/transferSites
Restart all SecureTransport services
Setup AWS
Generate Access Keys
The AWS access keys are needed to make programmatic calls to AWS. When you create your access keys, you create the access key ID (for example, AKIAIOSFODNN7EXAMPLE) and secret access key (for example, wJalrXUtnFEMI/K7MDENG/bPxRfiCYEXAMPLEKEY) as a set. The secret access key is available for download only when you create it.
If you don't download your secret access key or if you lose it, you must create a new one.
To create access keys when signed in as an IAM user:
Sign in to the AWS Management Console as an IAM user.
In the navigation bar on the upper right, choose your user name and then choose My Security Credentials.
To create an access key, choose Create access key. If you already have two access keys, this button is disabled and you must delete an access key before you can create a new one. When prompted, choose either Show secret access key or Download .csv file. This is your only opportunity to save your secret access key. After you've saved your secret access key in a secure location, chose Close.

Generating Access Keys
Create an Amazon S3 bucket
An Amazon S3 bucket is a public cloud storage resource available in Amazon Web Services' (AWS) Simple Storage Service (S3). To upload data to an Amazon S3, you must first create an Amazon S3 bucket in one of the AWS Regions.
Sign in to the AWS Management Console and open the Amazon S3 console at https://console.aws.amazon.com/s3/.
Choose Create bucket.
In Bucket name, enter a DNS-compliant name for your bucket. After you create the bucket, you can't change its name. The bucket name must:
Be unique across all of Amazon S3.
Be between 3 and 63 characters long.
Not contain uppercase characters.
Start with a lowercase letter or number.
In Region, choose the AWS Region where you want the bucket to reside. Choose a Region close to you to minimize latency and costs and address regulatory requirements. Objects stored in a Region never leave that Region unless you explicitly transfer them to another Region.
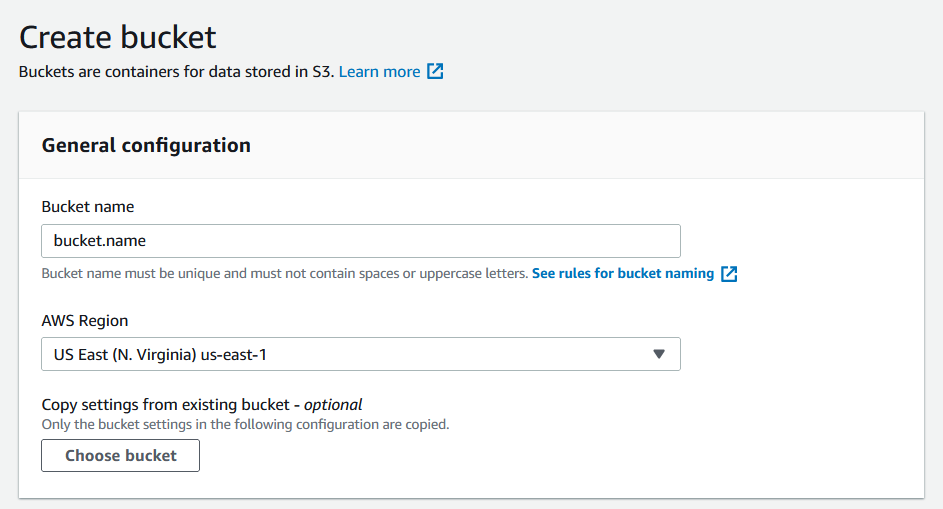
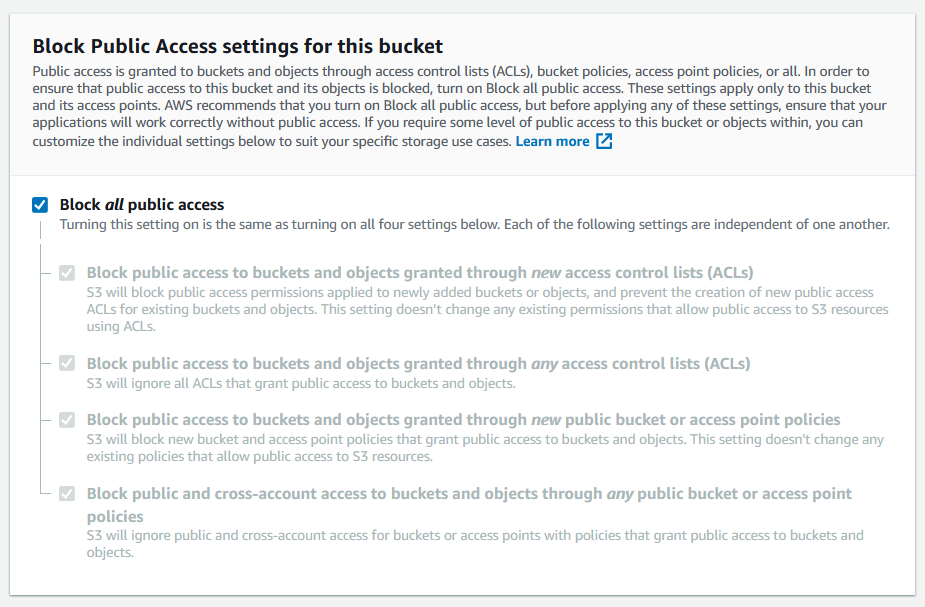
In Bucket settings for Block Public Access, choose the Block Public Access settings that you want to apply to the bucket.
Choose Create bucket.
Set permissions for Amazon S3 Bucket
By default, all Amazon S3 buckets and objects are private. Only the resource owner which is the AWS account that created the bucket can access that bucket. The resource owner can, however, choose to grant access permissions to other resources and users. One way to do this is to write an access policy. More about the access policies can be found in the Amazon S3 User Guide.
To create or edit a bucket policy
Sign in to the AWS Management Console and open the Amazon S3 console at https://console.aws.amazon.com/s3/.
In the Buckets list, choose the name of the bucket that you want to create a bucket policy for or whose bucket policy you want to edit.
Choose Permissions.
(Optional) Choose Policy generator to open the AWS Policy Generator in a new window.
On the policy generator page, select S3 Bucket Policy from the Select Type of Policy menu.
Add one or more statements by populating the fields presented, and then choose Generate Policy.
Copy the generated policy text, and return to the Edit bucket policy page in the Amazon S3 console.
Under Bucket policy, choose Edit.
In the Bucket policy editor text box, type or copy and paste a new bucket policy, or edit an existing policy. The bucket policy is a JSON file. The text you type in the editor must be valid JSON.
Choose Save changes.
Example:
{
  "Version": "2012-10-17",
  "Id": "ExamplePolicy01",
  "Statement": [
    {
      "Effect": "Allow",
      "Principal": {
        "AWS": "arn:aws:iam::123456789012:user/Dave"
      },
      "Action": [
        "s3:GetObject",
        "s3:GetBucketLocation",
        "s3:ListBucket"
      ],
      "Resource": [
        "arn:aws:s3:::awsexamplebucket1/*",
        "arn:aws:s3:::awsexamplebucket1"
      ]
    }
  ]
}
Note Minimum S3 permissions needed for typical scenarios:
PUSH to s3 bucket: s3:ListBucket, s3:GetBucketLocation, s3:PutObject, s3:PutObjectACL.
Auto create a s3 bucket and push file in it: s3:ListBucket, s3:GetBucketLocation, s3:PutObject, s3:PutObjectACL, s3:CreateBucket.
PULL from s3 bucket: s3:ListBucket, s3:GetBucketLocation and s3:GetObject.
PULL from s3 bucket and delete the remote files upon success: s3:ListBucket, s3:GetBucketLocation, s3:GetObject, s3:DeleteObject.
PULL from s3 bucket and rename the remote files upon success: s3:ListBucket, s3:GetBucketLocation, s3:GetObject, s3:CopyObject.
Create an IAM Role
You can use IAM roles to delegate access to your AWS resources. With IAM roles, you can establish trust relationships between your trusting account and other AWS trusted accounts. The trusting account owns the resource to be accessed and the trusted account contains the users who need access to the resource.
To create a role:
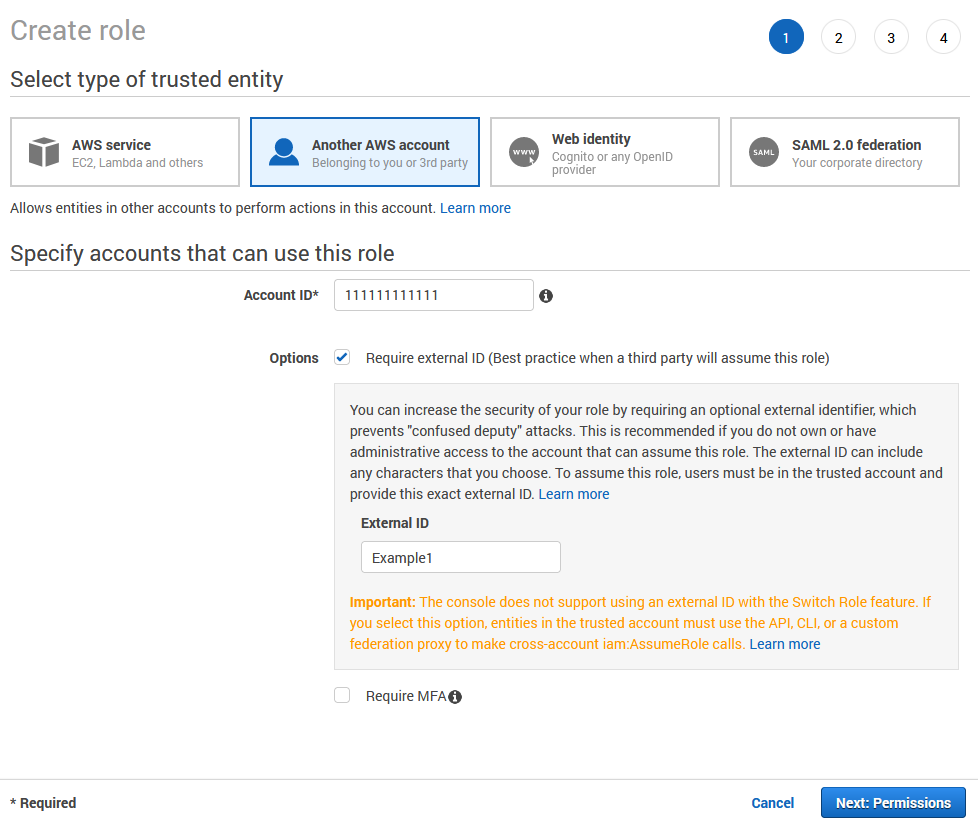
Sign in to the AWS Management Console and open the Amazon S3 console at https://console.aws.amazon.com/s3/.
In the navigation pane of the console, choose Roles and then choose Create role.
Choose the Another AWS account role type.
For Account ID, type the AWS account ID to which you want to grant access to your resources. The administrator of the specified account can grant permission to assume this role to any IAM user in that account. To do this, the administrator attaches a policy to the user or a group that grants permission for the sts:AssumeRole action. That policy must specify the role's ARN as the Resource.
If you are granting permissions to users from an account that you do not control, and the users will assume this role programmatically, then select Require external ID. The external ID can be any word or number that is agreed upon between you and the administrator of the third-party account. This option automatically adds a condition to the trust policy that allows the user to assume the role only if the request includes the correct sts:ExternalID.
Choose Next: Permissions.
IAM includes a list of the AWS managed and customer managed policies in your account. Select the policy to use for the permissions policy or choose Create policy to open a new browser tab and create a new policy from scratch. After you create the policy, close that tab and return to your original tab. Select the check box next to the permissions policies that you want anyone who assumes the role to have. If you prefer, you can select no policies at this time, and then attach policies to the role later. By default, a role has no permissions.
Example policy which allows s3:ListBucket, s3:GetBucketLocation, s3:PutObject, s3:GetObject and s3:DeleteObject on bucket with name bucket.name:
{
  "Version": "2012-10-17",
  "Statement": [
    {
      "Effect": "Allow",
      "Action": [
        "s3:GetBucketLocation",
        "s3:ListBucket"
      ],
      "Resource": [
        "arn:aws:s3:::bucket.name"
      ]
    },
    {
      "Effect": "Allow",
      "Action": [
        "s3:GetObject",
        "s3:PutObject",
        "s3:DeleteObject"
      ],
      "Resource": [
        "arn:aws:s3:::bucket.name/*"
      ]
    }
  ]
}
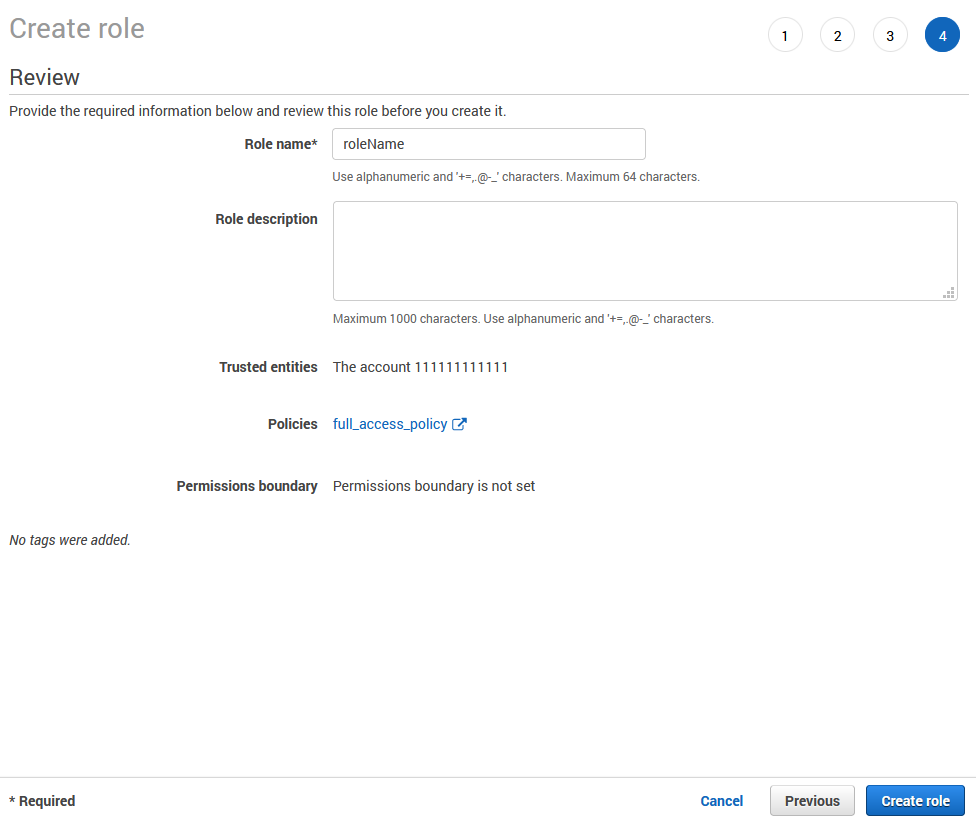
Choose Next: Tags.
(Optional) Add metadata to the role by attaching tags as key–value pairs.
Choose Next: Review.
For Role name, type a name for your role. Role names must be unique within your AWS account. Because other AWS resources might reference the role, you cannot edit the name of the role after it has been created.
(Optional) For Role description, type a description for the new role.
Review the role and then choose Create role.
Configure a Transfer Site in SecureTransport
Create a Transfer Site under an existing User Account. Choose S3 from the Transfer Protocol dropdown menu.
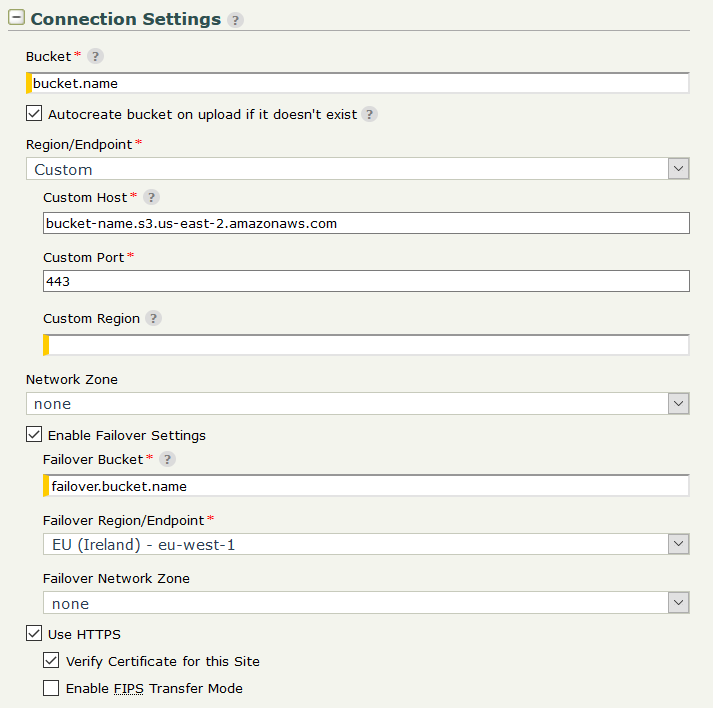
Connection settings
Bucket - Set the name of the bucket. The Autocreate bucket option can be used to create the bucket on upload if it doesn't exist.
Region/Endpoint - Choose the AWS region where the specified Bucket resides. Choose Custom to configure a custom S3 endpoint and specify Custom Host, Custom Port and Custom Region to explicitly identify the endpoint host, port and region of a S3 service provider.
Enable Failover Settings - Enable or disable failover to an alternative bucket in case of connection failure to the primary one.
Failover Bucket - Set the name of the bucket in case of failover.
Failover Region/Endpoint - Choose the AWS region in case of failover. Choose Custom to configure a custom failover S3 endpoint and specify Failover Custom Host, Failover Custom Port and Failover Custom Region to explicitly identify the failover endpoint host, port and region of a S3 service provider.
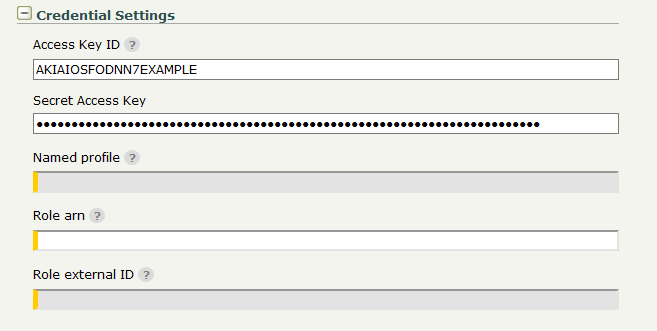
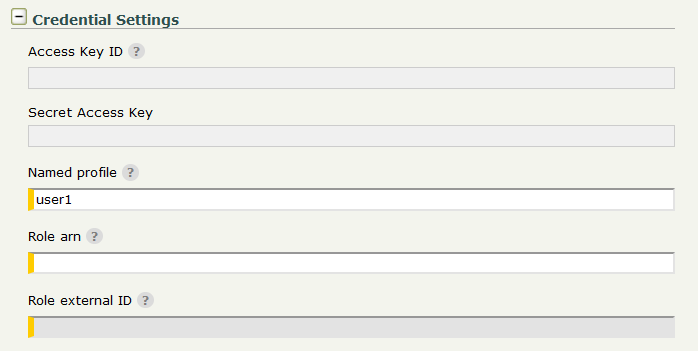
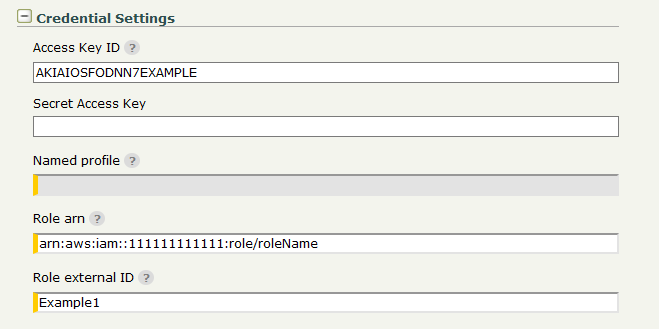
Credential Settings
The Amazon S3 Transfer Site offers several options for authentication:
If neither credentials nor named profile are specified, the AWS default credential provider chain will be used for authentication.
Access Key ID/Secret Access Key pair - Access keys consist of two parts: an access key ID (for example: AKIAIOSFODNN7EXAMPLE) and a secret access key (for example: wJalrXUtnFEMI/K7MDENG/bPxRfiCYEXAMPLEKEY). Access keys are used to sign programmatic requests to Amazon S3.
Named profile - Set the name of the Profile to be used for authentication to Amazon S3. Profile is taken from credentials and config files that are stored in the .aws folder in the home directory.
Configure Role arn if AssumeRole operation is required to obtain temporary security credentials. Amazon Resource Name (ARN) looks like arn:aws:iam::111111111111:role/roleName , where 111111111111 is the ID of the AWS Account that created the role with name: roleName. If the external ID is required in order to assume the role then Role external ID must be provided.
Download/Upload settings
Configure the download and upload settings as for a regular Transfer site, as well as any needed PTA settings.
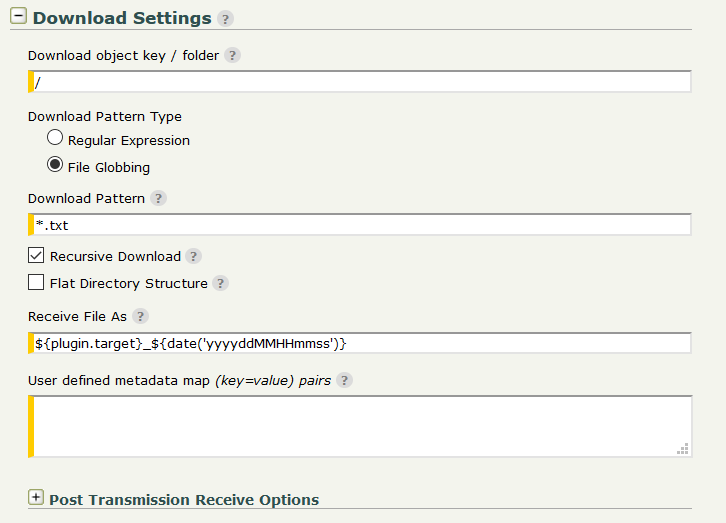
Download Settings
Recursive Download - If enabled, all sub-folders of the specified download folder will be scanned and download will be performed recursively.
Flat Directory Structure - If enabled, the remote folder structure will be ignored and the files will be downloaded directly into the ST account's subscription folder.
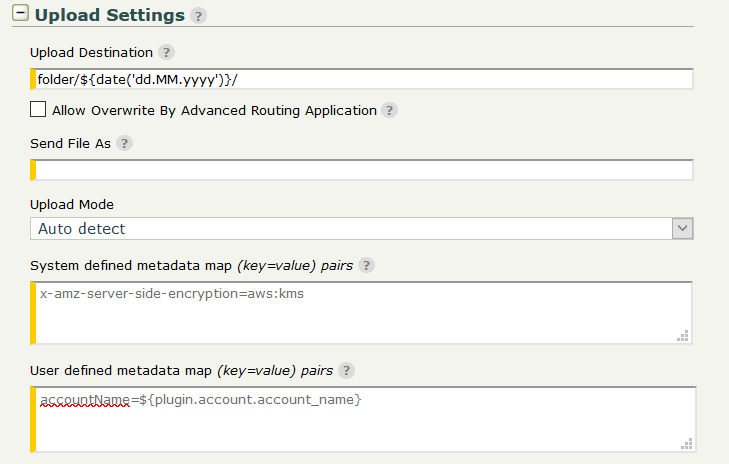
Upload Settings
Upload Mode - Choose Upload mode - Single for a single put operation, or Multipart for multiple put operations. The Auto detect mode switches between Single and Multipart depending on the file size.
System defined metadata map - For each object stored in a bucket, Amazon S3 maintains a set of system metadata. When you upload objects, you can configure values of these system metadata items. Examples:
- Setting Cache Control:
Cache-Control=max-age=(seconds); - Setting server-side encryption:
x-amz-server-side-encryption=AES256.
User defined metadata map - When uploading an object, you can also assign metadata to the object. Тhe optional user-defined metadata names are set on the remote file with x-amz-meta- prefix.
Test the setup
Server Initiated Pull by ST
Create a Subscription to a Basic Application (BA).
In the For Files Received from this Account or its Partners section, select Automatically retrieve files from and select the Amazon S3 Transfer Site from the drop-down.
Set a schedule or alternatively, use the Retrieve Files Now button after the Subscription was saved (i.e. save the Subscription, re-open it and then use the button).
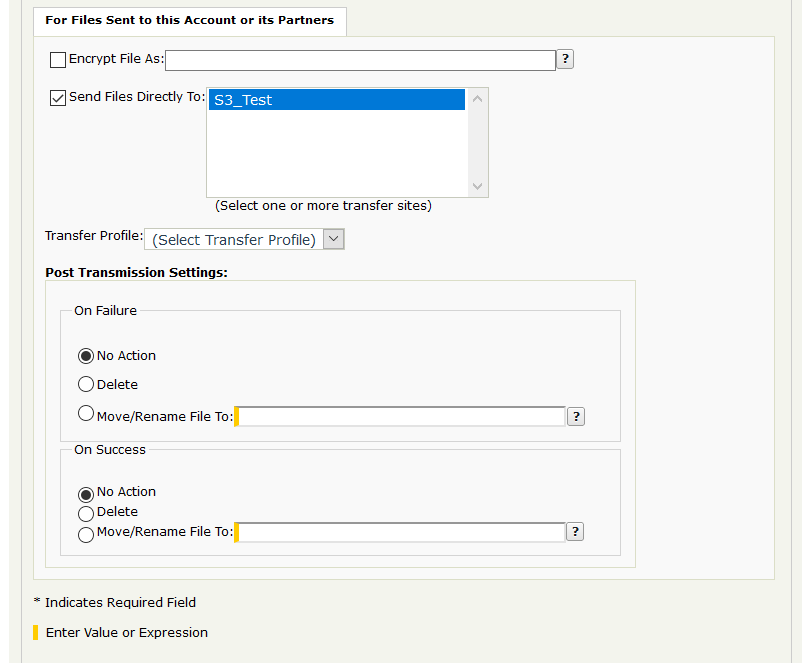
[optional] Under For Files Sent to this Account or its Partners, select Send Files Directly To and select a different Site where the test file should be sent to (local or remote location) after it's pulled from S3.
Save the Subscription.

Place a test file in the Amazon S3 bucket specified in the "Connection Settings" in the folder that was defined under "Download Settings" of the Amazon S3 Transfer Site in ST.
Wait for the scheduler to trigger or use the Retrieve Files Now button in the Subscription.
Go to Operations → File Tracking → Show Advanced Search, then filter by "Protocol: S3" and make sure each of the transfers succeeded with green check Transfer Status icon.
Server Initiated Push from ST
Create another Subscription to a Basic Application (BA).
Under For Files Sent to this Account or its Partners, select Send Files Directly To and select the Amazon S3 Transfer Site.
Login to ST with the user account and upload a test file in the Subscription Folder. Wait for a few seconds.
Go to Operations → File Tracking → Show Advanced Search, then filter by "Protocol: S3" and make sure each of the transfers succeeded with green check Transfer Status icon.
If all have succeeded, go to the Amazon S3 bucket specified in the "Connection Settings" and check the folder defined under "Upload Settings" of the Amazon S3 Transfer Site in ST. The file should be there.
Troubleshooting and Notes
To enable extended debug logging, edit the <FILEDRIVEHOME>/conf/tm-log4j.xml config file. Find the com.axway.st.plugins.site logger element and set its level value to DEBUG.
The Amazon S3 Transfer Site can be configured using the /sites ST Admin REST API endpoint. The REST API definition of the Amazon S3 Transfer Site is available in Swagger YAML file format under <FILEDRIVEHOME>/plugins/transferSites/axway-site-s3.
For a complete list, refer to the section Known Issues and Limitations in the README.md file included in the Amazon S3 Connector archive.
When a transfer to the AWS S3 remote site has failed, the steps below can be used as guidelines how to troubleshoot the issue. Yet, as a first step, you should always verify that the Account Key ID, Secret Key ID, bucket name and Endpoint name in the Transfer Site are correct and up to date.
- Go to Operations → File Tracking → Show Advanced Search, then filter by "Protocol: s3".
- Click on the red X Transfer Status icon related to the failed transfer, expand the window and take a screenshot of the entire content. The screenshot will be requested by Axway Support in case it is needed to open a Support ticket.
- Click on the SessionID link, which redirects to the Server Log with filtered results related to the transfer session.
- Inspect the messages related to the transfer session.
- The detailed error/root cause is likely to be presented in these event messages. Click on the timestamp link next to the message that might hold the error. Expand the window. Detailed error message/stack trace is presented.