KB Article #180731
SMB Connector for SecureTransport - installation and basic configuration
This article is intended to be a guidance and provide an example basic setup for an SMB Transfer Site in SecureTransport.
Table of contents
Introduction
The SMB Connector is available as a plugin and is not included in the core SecureTransport product. The plugin can be downloaded from the Axway Repository free of charge. Once the plugin is deployed, the SMB Transfer Site will appear in the SecureTransport Admin UI along with the rest of the Transfer Sites.
The SMB Connector for SecureTransport has been tested with the SMBv2 and SMBv3 protocols.
Installation
Download
The SMB Connector for SecureTransport can be downloaded from the Axway Repository from this link.
Prerequisites
Before proceeding further, check the Prerequisites section of the README.md file, which is available in the Connector zip archive.
Remove previous deployments (if any)
Make sure that there are no files/folders from previous versions of the SMB Connector. For that purpose, check the <FILEDRIVEHOME>/plugins/transferSites/ folder, and remove everything related the previous version of this plugin (if they exist). Refer to the README.md for a complete list of folders.
Unzip the package
Extract the zip archive with the SMB Connector securetransport-plugins-site-smb-<version>.zip into <FILEDRIVEHOME>/plugins/transferSites/.
Add a logger
You need to add a dedicated Transaction Manager (TM) logger for the newly deployed SMB Connector, so that events related to the Connector are available in the Server Log. Follow the steps below.
Take a backup copy of the <FILEDRIVEHOME>/conf/tm-log4j.xml file;
Open the <FILEDRIVEHOME>/conf/tm-log4j.xml file for editing;
Add the following logger in the beginning of the loggers section of the file, with the desired logging level:
<logger name="com.axway.st.plugins.site.ts" additivity="false">
    <level value="info" />
    <appender-ref ref="ServerLog" />
</logger>
<logger name="com.axway.st.plugins.site.smb" additivity="false">
    <level value="info" />
    <appender-ref ref="ServerLog" />
</logger>
<logger name="com.hierynomus" additivity="false">
    <level value="info" />
    <appender-ref ref="ServerLog" />
</logger>
To enable debug logging, set the level value to debug. However, change the value with caution. It is recommended to switch to levels different than INFO only temporarily, e.g. during troubleshooting sessions.
Save the file
Restart ST's services
<FILEDRIVEHOME>/bin/stop_all
<FILEDRIVEHOME>/bin/start_all
Verify the installation
The installation can be verified in two ways:
Server Log
Go to the Admin UI → Operations → Server Log and filter by the ADMIN Component. Expand the Advanced Search options and put "Plugin Loaded" in the Message field. Scan the results for Custom-Site=com.axway.st.plugins.site.smb.spi12.SmbSite.
Transfer Site
Open an ST user account and create a new Transfer Site under Admin UI → Accounts → [user] → Transfer Sites → Add New. The Transfer Protocol dropdown should contain "SMB".
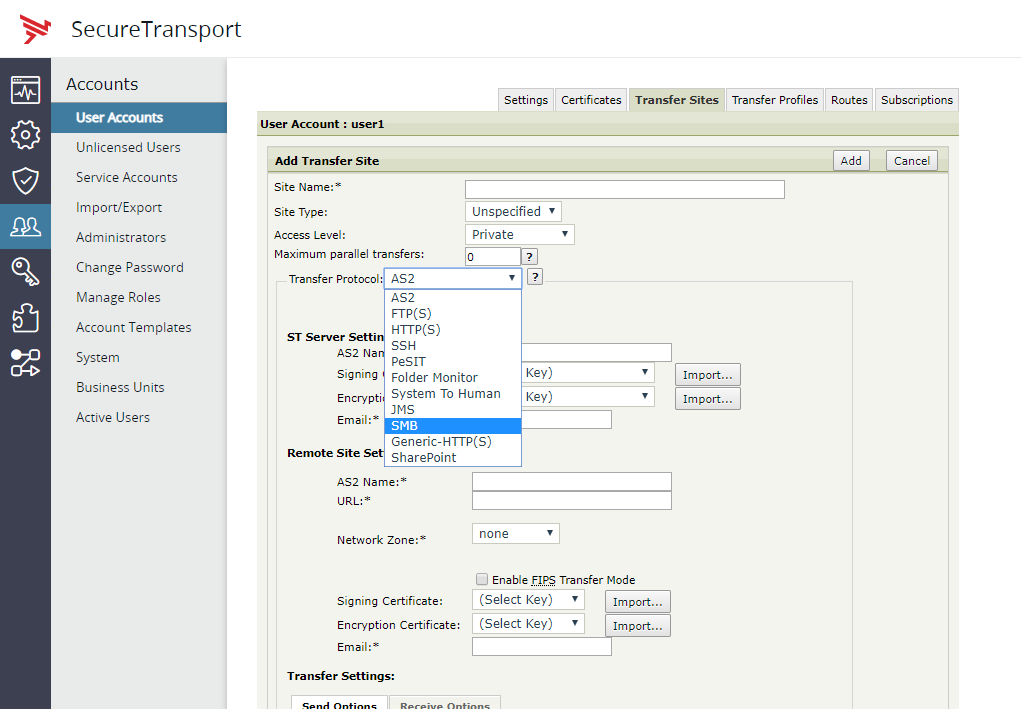
Setup
This picture illustrates the basic configuration required for a working SMB Transfer Site:

You can use the contextual help (i.e. the [?] buttons) for information about each of the fields in the Transfer Site.
Test the setup
Server Initiated Pull by ST from the SMB host
- Create a Subscription to a Basic Application (BA).
- in the For Files Received from this Account or its Partners section, select "Automatically retrieve files from" and select the SMB Transfer Site from the drop-down.
- Set a schedule or alternatively, use the Retrieve Files Now button after the Subscription was saved (i.e. save the Subscription, re-open it and then use the button).
- [optional] Under For Files Sent to this Account or its Partners, select "Send Files Directly To" and select a different Site where the test file should be sent to (local or remote location) after it's pulled from the SMB host.
- Save the Subscription.
- Place a test file on the SMB host in the folder that was defined under "Download Settings" of the SMB Site in ST.
- Wait for the scheduler to trigger or use the "Retrieve Files Now" button in the Subscription.
- Go to Operations → File Tracking → Show Advanced Search, then filter by "Protocol: smb" and make sure each of the transfers succeeded with green check Transfer Status icon.
Server Initiated Push from ST to the SMB host
- Create another Subscription to a Basic Application (BA).
- Under For Files Sent to this Account or its Partners, select "Send Files Directly To" and select the SMB Transfer Site.
- Login to ST with the user account and upload a test file in the Subscription Folder. Wait for a few seconds.
- Go to Operations → File Tracking → Show Advanced Search, then filter by "Protocol: smb" and make sure each of the transfers succeeded with green check Transfer Status icon.
- If all have succeeded, go to the SMB host and check the folder defined under "Upload Settings" of the SMB Site in ST.
- The file should be there.
The latest patch for SecureTransport 5.4 allows you to see the transfers' security parameters when you click on a transfer on the File Tracking page:

Troubleshooting
When a transfer from/to the SMB host has failed, the steps below can be used as guidelines how to troubleshoot the issue.
- Go to ST's Admin UI → Operations → File Tracking, expand the "Show Advanced Search" and filter by File, or by Protocol: smb, etc.
- Click on the red X Transfer Status icon related to the failed transfer, expand the window and take a screenshot of the entire content. The screenshot will be requested by Axway Support in case it is needed to open a Support ticket.
- Click on the SessionID link, which redirects to the Server Log with filtered results related to the transfer session.
- Add an additional filter for ERROR log level and hit Go.
- The detailed error/root cause is likely to be presented in these event messages. Click on the timestamp link next to the error message(s) and expand the window. Detailed error message/stack trace is presented which may contain further details for the root cause.
In case the error does not provide an explanation what had happened, take a screenshot of the window mentioned in the last bullet point and/or export the log results using the "Export Log" button and open a ticket with Axway Support for further investigation. In case the Transaction Manager (TM) log is exported in flat file, send an archived copy of the TM log to Axway Support, along with the timeframe/timestamp details of the failed transfer.
Additionally, some advanced global settings can be modified to address stability issues under heavy load and DFS infrastructure issues:
SMB specific global configuration
------------------------------------------------------
1. Connect/disconnect preventive timeout

A global (valid for all SMB site instances) configuration option for timeout of SMB Connect/Disconnect activities
can be specified as a JVM parameter (in seconds). Default value is 180 seconds.

In order to reconfigure it, add the following line to <FILEDRIVEHOME>/bin/start_tm_console
just before line "#BEGIN GC LOGGING" and replace default value '180' with the preferred one:

  JAVA_OPTS="-Dcom.axway.st.plugins.site.smb.client.connect-disconnect.timeout=180 $JAVA_OPTS"

2.Advanced SMB jNQ library configuration

Behaviour of jNQ (SMB) lib can be configured by specifying properties in file:
  <FILEDRIVEHOME>/bin/properties/config.properties
*** Note that this path and file does not exist by default ***

In order to configure custom timeout settings, following configuration can be used:
  RETRYCOUNT=1
  TRANSPORTTIMEOUT=1000
  CONNECTION_TIMEOUT=1000
  MULTICAST_RESOLUTION_TIMEOUT=500
  UNICAST_RESOLUTION_TIMEOUT=500

Default values are:
  RETRYCOUNT=3
  TRANSPORTTIMEOUT=5000
  CONNECTION_TIMEOUT=4000
  MULTICAST_RESOLUTION_TIMEOUT=2000
  UNICAST_RESOLUTION_TIMEOUT=2000

RECOMМENDED: To avoid using specific for jNQ HOSTNAME resolution and to use be used external(Java's) resolution , following parameter can be specified:
  ISUSEEXTERNALONLY=true

To specify transfer transports to be used, following parameter can be specified (default value is 'TRANSPORTSMBOVERTCP,TRANSPORTSMBOVERNETBIOS'):
  TRANSPORT=TRANSPORTSMBOVERTCP

For more details, refer to: <FILEDRIVEHOME>/plugins/transferSites/${target.jar.filename}/jNQ-Config.html

Note: Each reconfiguration requires a restart of ST TM to take the new values into account.