KB Article #181667
Configure enduser-SSO in SecureTransport using Azure AD SAML Toolkit as IDP
Summary
This article will describe how to use Azure AD SAML Toolkit as an IDP for the SecureTransport's SSO functionality.
Prerequisites
Enable SSO login in SecureTransport
Generate a new X509 certificate in ST and export the whole chain and import it into the Azure SAML toolkit. Experience shows that Azure plays well with .pfx certificates only, so after exporting the .p12 from SecureTransport you can convert it to .pfx.
Configure Azure AD SAML Toolkit
Create an Azure AD SAML Toolkit Enterprise application. On the Azure AD SAML Toolkit's Single sign-on page navigate to "Single sign-on" and select SAML.
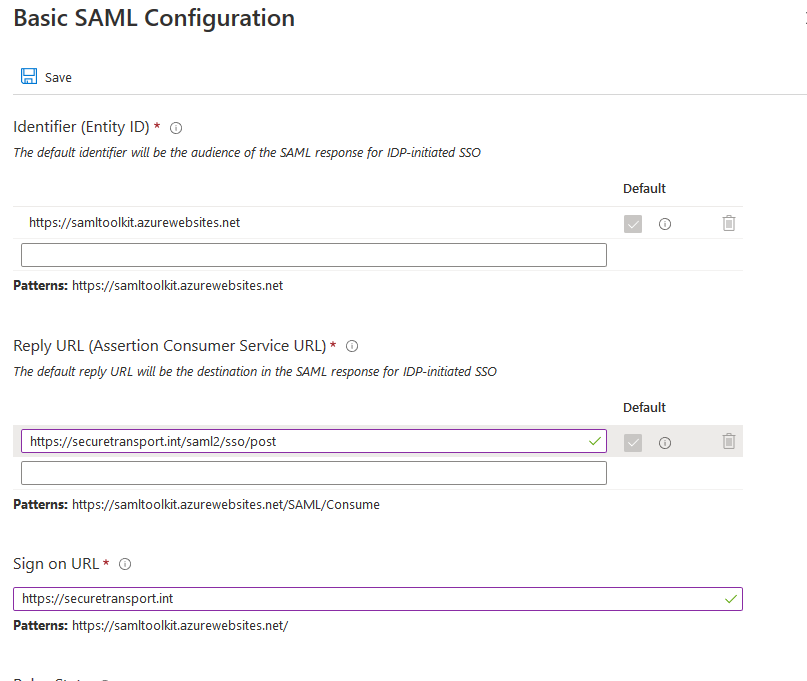
Edit the Basic SAML configuration

Basic SAML configuration
Identifier (Entity ID) - this would be for the Azure AD to identify the Enterpris application (you could leave the default name there)
Reply URL: https://securetransport.int/saml2/sso/post (where the assertion has to be consumed by the ServiceProvider)
Sign on URL: https://securetransport.int (the actual page where the user would be taken)
Note that these are example values and you should use your own here!
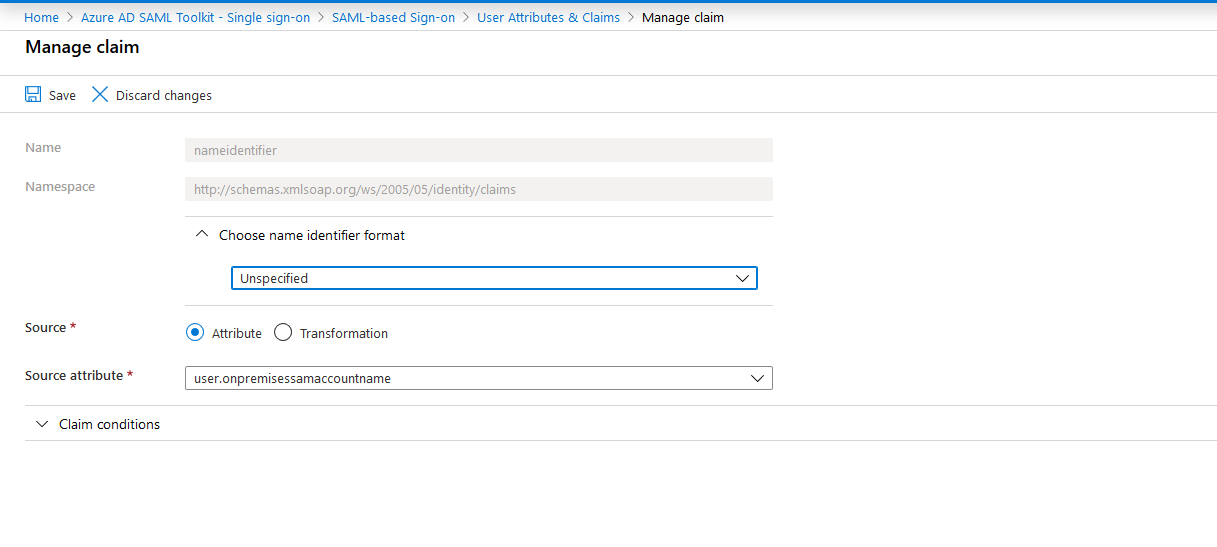
Configure User Attributes & Claims

User Attributes & Claims
Under "Required claim" click on Unique User Identifier (Name ID) to edit it
Under "Choose name identifier format" select "Unspecified" from the drop down
Under "Source" select "Attribute"
Under "Source attribute" select user.onpremisessamaccountname
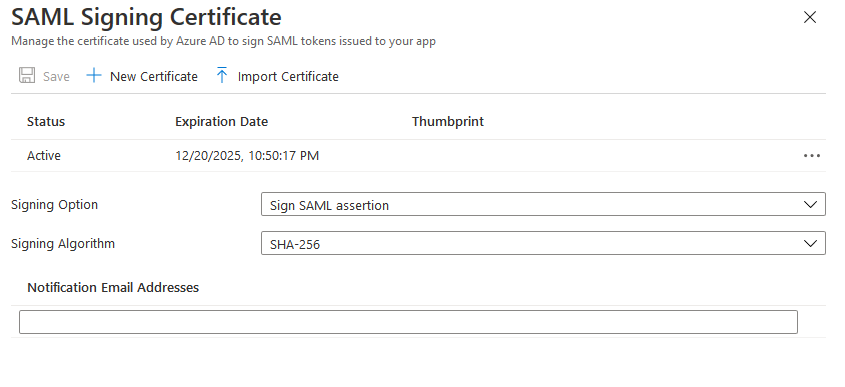
Configure SAML Signing Certificate

SAML Signing Certificate
Select Signing Option to be "Sign SAML assertion" from the drop down
Select Signing Algorithm to be "SHA-256" from the drop down
Click on the "Import Certificate" button
Browse for the certificate exported in .pfx fromat in "Prerequisites step 2"
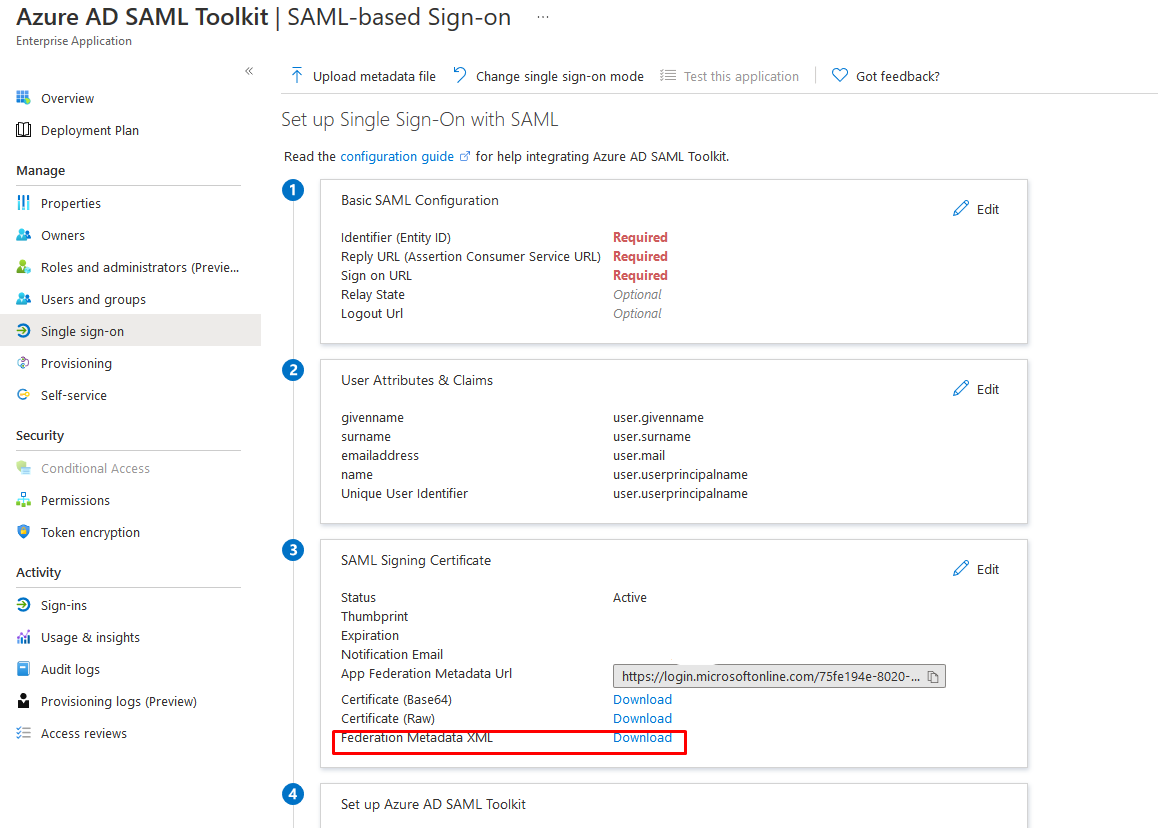
Export the Federation Metadata XML
After completing the above steps, click on the Download button standing next to "Federation Metadata XML" on the "SAML Signing Certificate" section.

Save the XML file as you will need it later.
Configure SecureTranpsort
Navigate to Operations → Server Configuration → Configuration Files → SSO_Configuration_Files to download the SSO-configuration-export.zip file.
Edit the sso-enduser.xml to have the same structure as the below one where <SamlIdentityProvider> entityId must be the same as the <EntityDescriptor> entityID in the ExampleFederationMetadata.xml file (the exported metadata file from Azure).
Example for the sso-enduser.xml file:
<?xml version="1.0" encoding="UTF-8" standalone="yes"?>
<SSOConfiguration>
    <CertificateValidation
        pathValidation="true"
        enableRevocation="false"
        trustStoreInitializer="com.axway.st.server.sso.impl.TrustStoreInitializer"
    />
    <ServiceProvider
            entityId="SecureTransport"
            filteredUri="/*"
            logoutUri="/logout"
            logoutRedirectUri="/logoutRedirect"
            keystoreInitializer="com.axway.st.server.sso.impl.KeyStoreInitializer"
            keyAlias="ssokey"
            sessionIdCookieName="STEndUserSsoCookie"
            useAppSessions="true"
            >
        <AssertionConsumerService binding="urn:oasis:names:tc:SAML:2.0:bindings:HTTP-Redirect" location="/saml2/sso/redirect"/>
        <AssertionConsumerService binding="urn:oasis:names:tc:SAML:2.0:bindings:HTTP-POST" location="/saml2/sso/post"/>
        <AssertionConsumerService binding="urn:oasis:names:tc:SAML:2.0:bindings:HTTP-PAOS" location="/saml2/sso/paos"/>
        <SingleLogoutService binding="urn:oasis:names:tc:SAML:2.0:bindings:HTTP-Redirect" location="/saml2/slo/redirect"/>
        <SingleLogoutService binding="urn:oasis:names:tc:SAML:2.0:bindings:HTTP-POST" location="/saml2/slo/post"/>
        <Features>
            <Feature key="secure-cookie" value="true"/>
            <Feature key="uid-generator" value="com.axway.st.server.sso.impl.UIDGenerator"/>
        </Features>
    </ServiceProvider>
    <IdentityProviders>
        <SamlIdentityProvider
          entityId="https://sts.windows.net/f35a6974-607f-47d4-82d7-ff31d7dc53a5/"
          metadataUrl="./idpMetadata.xml"
          verifyAssertionExpiration="true"
          sign="true">
          <Mappings>
               <RenameMapping source="department" target="department" />
               <RenameMapping source="email" target="fdxEmail" />
               <RenameMapping source="firstName" target="fullName" />
               <RenameMapping source="last name" target="lastName" />
               <RenameMapping source="username" target="username" />
          </Mappings>
          <Features>
               <Feature key="saml-response-binding" value="urn:oasis:names:tc:SAML:2.0:bindings:HTTP-POST"/>
               <Feature key="saml-allow-http-connection" value="false"/>
               <Feature key="saml-verify-metadata-signature" value="true"/>
               <Feature key="saml-allow-unsigned-assertion" value="false"/>
          </Features>
     </SamlIdentityProvider>
    </IdentityProviders>
</SSOConfiguration>
Take the exported ExampleFederationMetadata.xml and put it with all of the other XML files exported from ST and add the them all to a single zip (i.e SSO-configuration.zip).
Import the new configuration. Go to Operations → Server Configuration → Configuration Files → SSO_Configuration_Files and click Browse on the right and select the SSO-configuration.zip file to upload it.
Restart SecureTransport's services to reload the configuration.